29 March, 2010

NESTing Bowls

I love catching a tweet with a "must-do" craft project, and this one looks so easy and fun that I quickly tagged it a "favorite." It would have been perfect for the nesting baby shower I hosted last year for bff, Ashley, but it's also absolutely perfect for Easter decorations and Spring decor in general. Think what cute candy bowls this craft would make!

You Will Need
-4 sheets of fuchsia heavy-weight paper, 12" (30.5cm) square, such as card stock
-2 sheets of orange heavy-weight paper, 12" (30.5cm) square, such as card stock
-3 sheets of red heavy-weight paper, 12" (30.5cm) square, such as card stock
-Paper shredder or scissors
-Glue
-Water
-3 nesting bowls
-Brush
-Cling wrap, enough to cover the outer area of the 3 bowls

Instructions

1. Shred the fuchsia paper using an office crosscut paper shredder. If using a regular paper shredder, cut the strips into lengths of about 11/2" (3.8cm). If no paper shredder is available, use scissors to cut strips of paper that are 1/8" x 1/2" (3mm x 3.8cm).

2. Prepare a solution of glue and water that is 2 parts of glue per 1 part water. Don’t add too much water, or the paper will not hold together. Each bowl will require at least 1/2 cup (118ml) of the drippy glue solution.


3. Wrap the large bowl with cling wrap, and place it upside down on a surface covered with plastic.

4. Place the fuchsia shredded paper into another bowl, and sprinkle with some water (no more than 1 tablespoon [15ml]) to dampen the card stock.


5. Start by brushing the bottom of the cling-wrapped bowl with some of the glue solution. Add a small clump of paper (about 4–6 strips) in random fashion, and brush or dab more glue solution over them until they are damp enough that they lay flat and adhere to the bowl.

Instead of using colored card stock, this is the perfect opportunity to make something out of shredded office paper. The bowls will end up looking more rustic with the different colors of paper and typographic elements on them.


6. Continue adding clumps of paper strips, brushing the area they will cover with the glue solution and then brushing the glue solution over them. Cover the bowl until you’re about 2" (5cm) from the top edge of the bowl or the work surface. The bowl should be covered by at least 3 levels of paper to ensure stability. The edge of the bowl needs to be generally even, but keep it ragged by making some of the strips on the final row point downward, perpendicular to the work surface.

Tip: It’s important that the glue stay w enough to firmly hold the bowl together. The consistency of the 2 parts glue to 1 part water should resemble liquid soap. As you apply the glue solution, keep in mind that the more layers of paper are added the stronger the bowls will be. Allow drying time between layers. Note: Don’t worry about covering the surface completely. Part of the charm of the bowls is to leave some small spaces, no larger than 1/8" (6mm), between some of the strips.


7. Place the bowl in a dry and well-ventilated area, and let the surface dry completely. This process may take a day or two. If you’d like to speed it, place the bowl close to a Instead of using colored card stock, this is the perfect opportunity to make something out of shredded office paper. The bowls will end up looking more rustic with the different colors of paper and typographic elements on them. fan. Once the surface appears dry to the touch, carefully remove the bowl from the cling wrap and let it air dry face up until the inside of the bowl is completely dry as well.

8. Repeat the same process (steps 1-7) for the medium bowl using red paper and the smallest bowl using orange paper.

source & photo's: Woman's Day

22 March, 2010

Paper Cherry Blossom's

Spring is right around the corner. Despite a high in the low 40's today, I can feel it in my bones! And with Spring around the corner, that means it's time to lighten things up a bit and get in a more colorful mood. I stumbled upon this simple craft that I LOVE, and would look great as a simple decor in a guest room, on the kitchen table, or even make a fabulous shower decoration.

You Will Need
*Thin Pink paper
*Tape
*Scissors
*Bare branches
*Vase or frame

Directions

1) If you are not using origami paper, cut your paper into squares. For a better looks, use two different sizes of squares, 3 in. and 2.5 in.

2) Cut your branches to a size that will suit the frame or vase that you are using.

3) Fold your squares into cherry blossoms. You can find out how to fold them here (http://www.origami-club.com/en/flowers/sakura2/index.html). You can create slight variations in the flowers by the you cut them.

4) After you have arranged your branches in a vase or frame, attach the folded cherry blossoms to the branches using tape.


Source & Photos: Book Hour Craft Projects

16 March, 2010

Leprechaun Traps & Tricks

I am not Irish. And probably because I'm not Irish, I wasn't raised where St. Patrick's Day was a huge deal. Sure, we always wore green for luck, but mostly that was also so as not to spend the day getting pinched, either. Probably another reason St. Patrick's Day wasn't so huge to us was also because my birthday is the day AFTER St. Patrick's Day. But I digress...

As is turns out, lots of people celebrate St. Patrick's Day. Irish or not. And now that I'm a parent, I have to admit to getting into it a bit more. Irish or not. Some mom's I know go so far as to set "traps" so the leprechauns can't come play tricks on them. Did you know leprechauns are tiny crazy little things and love to play tricks on people? Yeah well me either. But apparently they've been known to do things like turn the gallon of milk green, toilet water green, leave green confetti all over people's houses, leave green ice cubes in the freezer, etc. Therefore, to avoid being tricked by the leprechaun, it is a good idea to create a trap for them.

Enter our Kindergarten Family Project. Each family had to create a leprechaun trap, which we had to send in today. And since I was out of town for 4 days over the weekend, this was left up to Mr. Monogram to execute. We were told in our project instructions that leprechauns do NOT obey signs or directions, that they like sparkly and shiny things, lots of sweets, and of course, gold. So after Mr. Monogram and the boys put most of the trap together, the boys and I completed the final decor after school and If I do say so, I think we've got our self a mighty fine leprechaun trap.

{The outside of our trap says "NO Leprechauns Allowed!" The leprechaun will enter through the tiny door w/ the gold pathway where there is a sign that tells him NOT to stand on that stack of coins and pull that green string for more gold coins. When he pulls it, because of course they do NOT follow directions, it dumps over the bucket with the marble, the marble goes down the steps, into the yellow bucket, and the trap falls down on TOP og the leprechan who us standing on the stack of gold coins. TRAPPED!}

At our school, the kindergartner's will lay their leprechaun traps outside their rooms along the hallway, and their 8th grade buddies will come fill them up with treats and so forth to make it look like leprechauns came. Cute, right? Then tomorrow, while they are in Music class, the homeroom mom's are coming in and "tricking" out the classroom and bringing in green lemonade, green cupcakes, etc. I can't wait to see their little faces.

Now, if you want to set up some tricks of your own, check out this, & this. And for trap ideas you can easily whip up today, go look at this, and this. Happy St. Paddy's Day!

19 October, 2009

Hallowenn Felt Garlands

I made my first felt bunting a few weeks ago for the Auburn/UT game and it turned out so stinkin' cute (if I do say so) that I thought to myself, "Why not make some cute Halloween garlands, while you're at it?!" So I did.

All last week, I sat in the pick-up line at the Mini's school with my scissors and felt and cut out my shapes, and now that they're completed and hung, I knew this would be a simple no-sew (yes, that's right, I said NO-SEW) project that many of you would love. As a bonus, it's also a recession friendly project because each garland cost me around $5. And that's something my wallet can get behind!

You Will Need
-scissors
-felt (go t JoAnn's and it's on sale this time of year in just about every color under the sun. Have them cut yardage for you. I bought 1/2 yard and it was perfect for my 2 garlands. Sure, you can go to the craft section and buy it in squares for 4/$1, but trust me when I tell you that you get more for your money when you have the yardage cut)
-glue gun
-narrow bias tape in your choice of color & length (in the sewing area, usually near the thread)

Directions
1) Cruise around online or in clip art for the perfect shape (pumpkin, crossbones, skull, bat, leaves, etc).

2) insert it into a word document in your desired size

3) print out the graphic, then cut it out.

4) trace onto your felt (tip: if using black felt, you will want to use a paint pen for your tracing)

5) cut out your shapes once stenciled onto the felt in the desired quantity (I just wing the quantity. If I need more, I cut more, if I need less, then well, I just throw the left-over away).

6) Meanwhile, heat up your glue gun so it's nice and hot.

7) Lay out your bias tape and decide how you want to make your garland look. I did two looks: 1 look my bats are overlapping and I actually didn't use any bias tape, but for my skull & crossbones, I used the bias tape so I wouldn't have to cut out as many shapes (only because that one had to be really long for my entire entry way banister).

8) Once you have your garland laid out how you want, glue in the appropriate spots, and you're done.

Here are what my end results look like...
(sorry for the terrible cell phone pictures, but honestly, I was too lazy to drag out my camera)

Skull & crossbones down the front stairway

Spooky bats draped across the family room mantle.

12 October, 2009

Pumpkin Carving with Preppy Puppy

On Friday I chaperoned mini #2's kindergarten field trip to the pumpkin patch. It's my favorite field trip because 1) this is my most favorite time of year and 2) it's the field trip where you get to spend the most amount of time with your child (and let's face it, if I'm going to ride the bus all the way to the pumpkin patch w/ a bunch of kindergartner's, I'd damn well better get to spend some quality time with my kid when I get off that bus). We always go to the pumpkin patch as a family so we will definitely be heading back in the next week or two, but it did get me motivated to start digging around online for some great pumpkin carving ideas for this year.

If you've been hanging around here since the conception of Monogram Momma's, you will likely remember these pumpkins (scroll down to the bottom to see mine). To date, they are still my favorite. However, this year I will be carving my pumpkin in the likeness of preppy puppy. Can you even stand it?!?!?!


Want to do your own?
Grab your free pumpkin carving stencil of your favorite breed here.

source & photo: BGH

06 October, 2009

Leaf Garland

Last week I made a great bunting out of felt for our Auburn tailgating. It turned out so cute, that I decided to do a Fall/Halloween one. I'll get to that later though, because while I was browsing my Google Reader, one of my favorite blogs had a similar project for a leaf garland that I thought many of you would like because it is done in paper, not felt.

You Will Need
-a real leaf from outside or faux leaf
-long strip of brown paper (or wrapping paper would work, too)
-pencil
-scissors

Directions
1) cut a long strip of paper the same width, then fold it accordion style until you end up with a 3x3 inch square.

2) arrange the leaf so that part of the leaf extends just slightly beyond the borders of the paper on two opposite folded sides (this is what will make it stay together as one long chain, like paper dolls).
3) Trace the leaf then cut. Be careful not to cut through the fold (see arrows). She angled her leaf slightly rather than tracing it straight up and down and I personally think it looks cuter that way.

4) Pull apart your leaves and VOILA! You've made your fall leaf paper garland!

source & photos: Hope Studios

15 September, 2009

Paper Globes

Everyone loves paper globes. Chances are, even if you have no occasion to decorate with paper globes, you still envy them and their fun, cheeky, and modern look.
Case and point: Here is a gorgeous display of paper globes that was done at my BFF's rehearsal dinner in August. Her MIL owns B.D. Jeffries in Atlanta, so her store designer drove up a U-Haul full of furniture, lighting, linens, etc., and amazing job decorating the restaurant and you can see how the abundance of paper globes really set the mood (and yes, I KNOW I am long overdue posting about this wedding!).


Of course, who doesn't love Lilly's Party Pom Pom's which came out last Spring? They've been a HUGE hit! Perfect for an indoor or outdoor party, or even a little girl's bedroom or fun for the playroom.

So let's get to it! Let's create our own paper globes! There are a few different versions of paper globes, and I'll go over other types as well b/c they are completely different from the one's I'm going to share today. Non-crafters need not run away scared from this one either! If you can cut a straight line and use a hole puncher, you are good to go. Cross my heart.

You Will Need
-Patterned papers cut into 8-1/2 x1/2" strips
-Brads (2 per globe)
-small hole punch

Instructions

1) Start with three strips of paper

2) Stack the paper pieces and wrap into a circle, overlapping about 1/2"

3) Punch a hole where the ends overlap , and then another hole
directly opposite the first hole. Put brads into both holes.

4) Lastly, fan out the paper pieces and VOILA!
You have a cute paper globe!

I love these for festive decorating. Just think how cute they would be hanging over your breakfast table in Halloween papers for Halloween? Or make them with papers which coordinate with your nest party and just have fun putting them here and there. Fill a bowl with them, and use for a fun, inexpensive table centerpiece. Since this is simple enough that kids can even help with, I'm going to make these into Christmas ornaments for the mini's tree in the playroom (we only decorate this tree with ornaments we've made and we make new ornaments every year together to add to their playroom tree). Also, for a fun little variation, try cutting your strips of paper with scissors that have a decorative edge (try scalloped!).

source & photo's: Schlosser Designs

28 August, 2009

Rosette T-Shirt Tutorial

Last week my painted Dr. Scholl's were featured on one of my favorite blogs, Tip Junkie. Along with my shoes, there was the MOST fab t-shirt which was a copycat of a popular J. Crew tee, which I have been just itching to share with you guys. It's soooo cute, and even you non-sewers take heart, because you can do this one too!!

The Inspiration (by J. Crew)

You Will Need
-2 inexpensive tee's the same color (check out Walmart for under $5 ea!!)
-scissors
-a coke can to trace (circle shape/size)
-needle& thread

Instructions
1)First of all, take one of your t-shirts, and cut 3 circles of different sizes from the fabric (the largest being the size of the diameter of the coke can). The circles don't have to be perfect so it's okay to just eyeball it.

2) layer the circles one on top of the other w/ the largest circle being on bottom.

3) Next, using your needle & thread, pinch the flower from inside the t-shirt and begin to stitch it in place. You need to create lots of fluff and make it really bunchy when sewing on the flowers, and you do this by pinching layers, & picking up folds & layers with the needle and thread.

4) Pack those rosettes in together really well, lifting the edges and bunching the flowers close together. These ladies used 7 rosettes for their tee's.

The Imitation (finished product!)
source & photos: Hope Studios

24 August, 2009

Now What?

Last Thursday marked our first day of 2nd grade and kindergarten respectively. What a BIG YEAR this is going to be what with mini #2 being the big boy kindergartner and mini #1 celebrating his First Holy Communion in the Spring. I can't help but sit here in my very quiet house wondering how did we get to this point so quickly and most of all, now what?

Mr. Monogram: well, you've got the whole house to yourself now every day. The boys don't get out of school until 3 o'clock. What are you going to do all day?

MM: Whatever the hell I want, that's what.

Case in point, it's nearing 10 a.m. and I'm still in my pajama's. All kidding aside though, my list of things to keep me busy is very long. Since the boys were home with me all summer long (which I really deserve a freaking medal for, btw), I've gotten a *tad* behind on the laundry. And Cleaning. And organizing. And packing. Yes, packing. Because did I tell you are moving? Once we can get this little "to-do" list sorted out and I can get some of these overstuffed closets packed up into boxes because I'm a pack rat who can't seem to throw anything away, not even a magazine from 1996, the house is going on the market. We've found a lot we love and really want to build a custom home but we're in no rush because my husbands industry sucks BIG TIME right now so we're taking our time.

Anyway, I've made myself a short-list of little projects I both need and want to accomplish before the sign goes in the yard, and like it or not, I'll be sharing these with you.

-Make new window treatment for Master Bedroom
-Make new window treatments for Master Bathroom
-I have a great idea for a big art project on canvas
-Make new desk skirt to match new drapes in Office
-Make cute slipcover for my office desk chair

So I'm thinking I won't have any trouble keeping busy.

21 July, 2009

Nautical Knot Tying: Monkey's Fist

Mr. Monogram grew up on the water and with his dad always owning a sailboat or sport fishing boat and his step-father owning a marina, it is fair to say he has been sailing since a very young age. He has taken me sailing in various parts of Florida, in Mexico, St. Lucia, and in the Mediterranean off the coast of Italy, and although I am not a big fan of boats, he is an excellent sailor (just don't tell him I admitted to that, mkay?). All this explains why he is great at all the fun yet confusing nautical knots that we all love so much.

Every summer I buy the mini's sailors bracelets from Nantucket Knotworks and swear I'm going to sit down a learn to do it myself but it never happens. It's sort of become one of our summer traditions, that the first day of their summer when school lets out, they each get their new bracelet for the summer. One of these days I really will sit down and learn how to do it, but before I show you how to do that, starting off with the classic Monkey's Fist Knot seems a little easier.

The Monkey's Fist Knot is sort of a roundish square knot that in it's large form, is tied around a heavy weighty object on the end of a heaving line to assist in docking a boat. But I've seen them in different sized used as bookends, door stoppers, and at Nantucket Knotworks, they even sell small ones as key chains which I love. And while they've got a convenient little kit for you to purchase, I'm going to show you a fantastic tutorial on how to do it yourself. I mean, I can already imagine these as great Christmas ornaments on mini #2's nautical themed tree in his bedroom, can't you?!


How to tie a monkey's fist - More DIY How To Projects

12 June, 2009

Mii Cupcakes

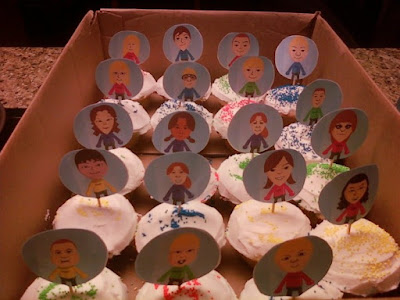
I always try to make a fun cupcake to bring to school for the entire class when it's one of the mini's birthday's. And since the boys are really into the wii, *cougharen'tweall* I thought it would be fun to come up with a mii themed cupcake for mini #1's birthday in February.

In a perfect world, I would be talented enough to whip something like these together...

photo: Bakerella via Flickr

However, this is by no means a perfect world and as such, this was the best I was able to do. Cute, simple, and a HUUUUUUGE hit with the kids at school. To make it even more fun, I kept them a surprise and didn't even tell mini #1. I even did mii cupcakes for his teachers.


What You Need
-Your Favorite cupcake recipe
-Avery Label 5294, 2.5" round printer labels
-Toothpicks
-Sprinkles of your choice
-Computer
-Printer

Directions
1) Bake your cupcakes and let cool.

2) Meanwhile, go online to this site, and create a mii for each person you're making a cupcake for.

3) Either "Print Screen" and copy to Photoshop or Paint for each individual mii, or use a program like Jing (I recommend Jing) to save each mii you create.

4) Once you've created and saved a mii for each cupcake, open your word processing program with the layout for the Avery Label template, and insert each mii into two circles. The reason each mii needs to have 2 circles/labels is because you will need a front and back.

5) Print up your labels.

6) Your final step is sticking 2 labels together, back-to-back, with the toothpick in between so they are ready to be inserted into your cupcakes.

7) Ice and decorate your cupcakes, stick in your mii's and they are ready to go!

*NOTE* If you are doing a fair amount of cupcakes, then I suggest putting each person's name on the shirt of their mii. This can be done once you've inserted them into the label template, before printing up, but adding a text box and making the outline and filling invisible.

05 June, 2009

Ribbon Beaded Necklace

The moment I saw this proect I knew I had to share it with my readers. This is a fun and cute idea, although honestly, I would do the beads all the way to the end of the ribbon (all the way around the entire neck), then put in a jewelry clasp in lieu of tying the end. You can get all your supplies from my favorite online trim store, M&J Trimming.


You Will Need
-1 yard of 50mm Midori Gala Dupioni Silk Ribbon (the color used here was Pin Moon)
-1 strand of 14mm Baroque Pearls ( #41520)
-Scissors
-Straight pins
-Thread and needle or a sewing machine


Instructions
1. First fold the ribbon in half and pin it along the edge.

2. Sew the two edges together which will create a tube.

3. Turn it inside out. You need to be patient in this step, since turning the tube inside out may take you a few minutes. You can use a chopstick to push the ribbon thru. You can also use a safety pin or a paper clip.

4. Now you can start putting the pearls inside the tube, make knots on the sides of it to make it stay in place.
source & photo: M&J Trimming

05 May, 2009

Ole'!

Hola chica's & Happy Cinco de Mayo! My love of mexico & their fine fare is no secret around these parts, and I can assure you that at some point today I *will* indeed be sporting a sombrero. In the mean time, pop open a cerveza or salt your margarita glass, enjoy the mariachi band, & grab your scissors & supplies for a simple and fun mexican paper flower making tutorial.

Mexican Tissue Flowers

You Will Need
-4 sheets pink tissue paper, 6" x 12" each
-4 sheets lime green tissue paper, 6" x 12" each
-Scissors
-Ruler
-Green pipe cleaner
-Color marker (if desired)
Instructions
1) Cut the pink tissue paper into 6" x 12" rectangles and stack in a pile of four sheets.
2) Keeping the pile together, fold the sheets along the 6" side, making 1" folds back and forth, like a fan. When you are finished, the folded tissue paper should be a rectangle measuring 1" x 6".

3) Round the four corners off by cutting with a scissors.

4) Fold the long edge of the pile in half so that it measures 1" x 3". Using the scissors, carefully make 2 diagonal cuts at the fold, each 1/4" from the edge, approximately 1/2" in length. (Note: be careful that you do not cut the folded tissue paper in half.) Open the fold back to its 1" x 6" shape. The shape should now resemble a bow tie.
5) Repeat steps 1 and 2 with the lime green tissue paper. Instead of step 3 (rounding off the corners), cut three sets of diagonal notches on both ends so that each side appears like a fork.
6) Repeat step 4 with the lime green tissue paper.

7) Fold a green pipe cleaner in half. Then place the folded pink tissue paper on top of lime green tissue paper and fasten together with the folded pipe cleaner. Squeeze the tissue paper in the middle and twist the pipe cleaner around to tightly secure the flower. This step also creates the stem of the flower.

8) With extreme care, fan out the pink paper on both sides of the pipe cleaner. (Be extra gentle: you do not want to rip the delicate tissue paper!) Slowly separate each of the four pink sheets, gathering each one toward the center. Behold your flower!

9) To create the leaves, fan out both sides of the lime green paper, but don't separate the sheets as you did with the pink paper. You want to leave the leaves thicker.
10) Gently shape with your hands until you achieve your desired form.

01 May, 2009

My First Time

Don't read into the title of this post; it's not what you're thinking. I just finished my first key fob this week and gave it to my girlfriend, Michel, today for her birthday and she just loved it. While I've done plenty of belts and pillows, never a fob.

Her father is a Dutch immigrant so she is all about everything Dutch and wooden shoes, tulips, windmills, the whole nine yards. They also love visiting all their family in Holland so I knew I had to do the Dutch flag on her key fob for her. Here she is as my lovely model.

If, like myself, you are a regular needlepointer and are wanting to make a key fob or two, I highly recommend you hop on over to Lisagh's Grosgrain Garage and follow her fantastic step-by-step instructions. You won't find a better explanation anywhere. The only slight variation I made to my fob is that I sewed the leather backing to the needlepointed fob in lieu of gluing it.
All in all, it turned out adorable & I see many more key fobs in my future. Thanks for the tips, Lisagh!

27 November, 2008

Happy Thanksgiving!

We are gearing up for the Macy's Thanksgiving Day Parade and a day of cooking and fun for the family and I hope you are too. And in case you're looking for something simple to keep the kids occupied while all the cooking mayham ensues, here's a little something for you.


Happy Thanksgiving!
Xo-MM

You Will Need
Corn husks
Pinecone
Craft glue
Twigs,
pieces of vine, or gourd stems
Tacky glue, such as Magna-TacTwine or string
Place card
Hole punch
Instructions
1. Using scissors, cut small feather shapes from corn husks. Dip the stems into craft glue, and insert them between the scales of the pinecone, attaching feathers to its base in several rows so that they fan out like a turkey's tail, with the lighter colored feathers in front.
2. Twist, shape, and trim a twig, piece of vine, or gourd stem to form the turkey's head and gobbler; gnarled gourd stems make interesting and distinctive faces. Apply tacky glue to its end, and secure onto the front of the pinecone.
3. Write the name of a guest on a place card. Punch two holes into the upper corners of the card, and thread a piece of twine or string through the holes. Knot the ends, and hang the card around the turkey's neck.

source: Martha Stewart

20 November, 2008

Custom Dress Forms in a Day

For all the home decor and small project sewing I do, there are very few clothing items I've actually ever made (or attempted to make, that is). Many years ago when bff Ashley and I were relatively new sewers (I'm talking about 11 or 12 years ago), we each decided to make something for ourselves. I bought a pattern for a super cute high waisted short sundress that I was going to make out of a pretty white eyelet fabric. It was supposed to be one of those patterns they claim is "Sew Easy!" Riiiiight. "Sew Easy" my foot. Anyway, Ashley for whatever reason, decided her first clothing attempt would be on a shirt. And no, not a t-shirt, but a blouse. As in long sleeves and buttons and the whole nine yards. I'm sure you are smarter that we were to realize this was most likely not going to end well.

And it didn't.

Both of our items turned out so tight that I could barely breathe because the chest was so tight, and that is nothing to say of the giant uni-boob my cute little sundress gave me as well and the circulation that was being cut off under my arm pits. As for Ashley, she could barely even button her blouse and if memory serves me correct, one sleeve was longer than the other and the collar was funky and the buttons and button holes were lopsided as well. You have to really know Ashley and I in real life to know that by George we were wearing our creations! I actually wore mine out of the house out to Mexican dinner with my family (I can still remember it well), and I'm pretty sure Ashley just wore hers around her apartment while she cleaned that day and ran errands. I'm sure we were quite a sight. However, in or defense, go ahead and try to take your own waist, chest, arm, and leg measurements and see how accurate you are. I dare you.

I've made a few small things with great difficulty for my nieces and the boys since, but I honestly really try to stay away from sewing clothes. That first experience did teach me something though. And that is, that if you're going to sew clothes for yourself, it is important to have a dress form. But geez, have you checked out the price on those suckers? They are not cheap, nor do they exactly fit in with my decor. But that's okay, because I found two awesome ideas for actually making your own exact replica dress form of your own body. Who knows, if I do this and decide I'm still not a good apparel seamstress, then if nothing else, having an exact replica of my body shape will probably encourage me to get back on my diet and exercise plan!

Duct Tape Dress Form (stick with me, I promise it's good)

You Will Need
-A large T-shirt that fits below the bum that will be cut up and destroyed in the process
-Another small piece of discard able cloth (a paper towel will do)
-At least two 45 gram rolls of duct tape
-A pair of sharp scissors
-Cardboard, and cardboard tubing
-Something to stuff the form with (peanuts, foam, polyfil, old clothes, be creative)
-A helper

Instructions (view slide show for photo montage)
1-Put on large T-shirt and have your helper begin to wrap the roll of duct tape around your body. Make sure the tape is somewhat smooth and that there are no gaps in between wraps. Stop wrapping once the bust is reached.

2-Cut several strips of tape from the roll and apply them it a vertical pattern along the curves of the bust for most natural looking shape fit. Be sure to pat the tape down after the helper applies it to ensure shape.

3-Once taping of bust is complete, begin to extend tape from front to back (making sure model’s hair is clipped up as not to tape hair...eek). Apply the second piece of fabric around the neck and back (sort of looks like a scarf or ascot) and begin wrapping tape around shoulders and bottom of arms until you have completed the basic shape of the dress form you are looking for.

4-Repeat by continuing to add two more layers of duct tape over original layer to complete a total of three layers. Fee free to either follow same wrapping method or try a vertical layering method, whichever you prefer.

5-With a sharpie, draw a vertical and horizontal line to mark the center of the dress form.

6-With the scissors, begin to cut tape and T-shirt at the base of the form where your line was drawn. Make sure you have your hand in place between the T-shirt and the regular shirt you are wearing as not to cut your own shirt in the process. If you are having a hard time cutting all the way up the form from the bottom, you can cut from the top as well.

7-Remove form from body and have your helper hold the form while you add a layer of tape to the cut line. Now you have the desired shape!

8-Cut a piece of cardboard that fits the bottom of your form and the sleeve holes, tape them in place and stuff the form until you have your desired shape and mass. Close off the top with tape. Either affix finished form to pole made from cardboard tubing or hang from hanger.
source: Etsy Labs


Molded Papier Mache Dress Form

You Will Need
-paper (brown paper is best so it looks nicer)
-glue
-water
-knife

Instructions (view slide show for photo montage)
1-First make a plaster mold. For full instructions, go to www.mytwindressforms.com.Cut the form in half along the sides. Line it with paper towels to keep the papier-mâché from sticking to the plaster.

2-Apply a 1/2-in. layer of papier-mâché. Make it thicker at the edges, and be sure they’re very smooth.

3-Drying may take several days. When fully dry, remove from the cast and smooth over surface cracks with a thin layer of papier-mâché.

4-Glue the halves together and tie firmly. Slide shims under the cords to tighten them as the glue dries.
source: Threads Magazine

27 October, 2008

Scared Stiff

I realize I've fallen down on my "job" (ha!) of sharing some great creative and festive Halloween ideas with you this time of year. I came across something adorable though, that I'm considering doing with mini #2 today. If you know someone who has an October birthday or just recently moved, these would make a great gift. You can even take these to a whole other level by making them as big as you want for a fabulous entryway statement.

You Will Need
-12-inch-long plastic foam cone
-4-inch-diameter plastic foam ball
-Twigs
-Masking tape
-Plastic wrap
-White fabric
-Fabric stiffener (available at crafts stores)
-Plastic bag
-Purple, green, and black fabric or craft pens

Instructions
1. Assemble a form for the ghost. Attach the foam ball to the top of the cone with a short straight twig. Use masking tape to fasten several twigs together to make arms, then insert the arms as desired into the sides of the cone. Cover the entire shape with plastic wrap.

2. Cut a piece of white fabric into a square or a circle. Make sure the fabric is large enough to fully cover the form with some extra for draping.

3. Pour 1 cup of fabric stiffener into the plastic bag. Place the fabric piece in the bag. (Photo 1) Squeeze the bag repeatedly to soak the fabric with stiffener. Add more stiffener to the bag, if necessary.

4. Remove the fabric from the bag. Lay it out on a flat surface that's covered with waxed paper. Press it with the heel of your hand to reshape the fabric so it will be easy to drape over the form.

5. Place the fabric over the form. Drape it to shape a ghost. Keep some of the fabric along the base so the ghost will stand by itself when it's removed from the form. (Photo 2) Let the fabric dry.

6. Paint on eyes, eyebrows, and a mouth. Remove the ghost from the form. Reuse the form to make more ghosts.

source: bhg

07 August, 2008

Needlepoint Pillows

This week I've been busy working on new graphics for The Monogram Marketplace. I'll show you a preview of those tomorrow, but in the meantime I promised to show you the new pillows I did for the family room.

The new pillows incorporated both needlepoint and conventional sewing with some very pretty trims that really brighten up the family room. I'm so pleased with them I can't even tell you. My pillow inserts are nice and full of down so the sofa is extra comfy and cushy when you sit down.

The new fabric is gorgeous and goes perfectly with my floor to ceiling gold and red silk drapes.

Here's the needlepoint insert I did. I needlepointed 2 identical "M"'s. I then sewed the needlepoint directly onto the pillow, then covered the edges with gold trim.

Then I made a longer, coordinating pillow for the center of the sofa with a really pretty apple green fabric, my main floral fabric from the needlepoint pillows, and added two vertical pieces of flat gold and green trim.

It's a bad picture, but here's the sofa with the new pillows. A lovely addition!

30 July, 2008

Frou Frou Tu-Tu's

I don't know if I've ever mentioned it, but Mini #2 is quite the charmer. With his big brown eyes, long dark eyelashes, and coffee bean skin (really the boy gets darker than all of us combined and it just makes no sense whatsoever), he really gets to the ladies. Especially the little ladies that are just his size. And it just so happened that one of his little girlfriends turned 4 on Monday. I have known what I wanted to get her for quite some time, but what with all the family in town and me being crazy busy around here, I completely ran out of time to order what I wanted to for her. Don't you just hate when that happens?

Never fear, Monogram Momma is here! I was determined to somehow figure out how to make what it is that I wanted to buy her. I mean, what little girl wouldn't love a big pouffy frou-frouey tu tu? The correct Answer is: there isn't possibly a little girl on earth who would not want a big pouffy frou-frouey tu tu.


You Will Need
-scissors
-1/4" elastic
-approx. 8 total yards of tulle (I used 2 yards of 4 different colors. You can use much less but remember that the more tulle you use, the pouffier it will be)

Instructions

1) To start out, wrap the elastic around the child’s waist and cut it where edges just meet. Overlap the elastic approximately 1-inch over the other side and
run a quick stitch (machine or hand) to securly fasten the edges. You now have your waistband.


2) Keeping the tulle folded in half, cut equal strips about 4-5" wide. Then once you have all your strips cut, open them up to the full width and cut them in half (on the fold where it was just previously folded in half).

3) Next, get a piece of each color of tulle (for me that was 4 pieces of tulle) and put them all together then loop around the elastic waist as my poorly drawn photo shows here. Note: I found it was much easier and quicker to put the eastic waistband on mini #2 and use him as a dress form and attach my tulle that way (and I have to give him props for being a really good sport while his brother called him a "girly princess" for being my helper).


3) This is what the waist will look like when they're all tied on there. Make sure each section of gathered/tied tulle is put very close to the next so the white waistband stays completely hidden.


Here is my finished product, being modeled by a very handsome young man, which turned out so, so adorable. I decided to add a big pretty gerber daisy to the back (which I just tied on through the center of the flower) that really finished off the entire tu-tu (ignore the green string.. I forgot to cut that before taking the photo's.) And to top if off, mini #2 is so excited that he actually helped me make his friends gift so it really will come from him when he gives it to her.

Now, if you love these tu-tu's but don't want to make one yourself, then go visit Hannah's Tutu's and you'll find exactly what you're looking for and more. I found a lot of tutu makers out there, but I really love these tutu's because they are the best product for the price. You will not find a tutu this full for this price anywhere else. Sure, you can find them less expensive, but they won't be anywhere near the fullness, nor will you have all the options you will get from Hannah's Tutu's. Truly, go check these out and they will inspire you!


15 July, 2008

Mandy's Needlepoint Belt Canvases

It’s been a while since I’ve done anything crafty or mildly creative on my blog (which is supposed to be an outlet for all my creative projects, so go figure). It’s not that I haven’t been doing anything creative, but it hasn’t exactly been blog-worthy. For a few months now I’ve been working on all new custom bedding for my sister in California which turned out to be a much bigger ordeal than I originally thought when I agreed to take it on for her (isn’t that usually the case though?). So that has completely consumed my sewing machine for a long time, working on it here and there whenever I had some free time. I’ll show pictures of the end result when she emails them to me so don’t worry. But it wasn't exactly something I wanted to document step-by-step for the blog.

And you know me, always working on a needlepoint project at the same time too, so I thought you guys would like to see my latest needlepoint project. My dad has always loved vintage criss craft boats, so for father’s day this year I found a needlepoint belt canvas of his favorite boats and completed it for him. I really enjoyed doing it and it turned out fantastic. He LOVES it and was so thrilled when he opened the package, and it’s going to look super cute on him.


Dare I say, Mr. Monogram was even a tad jealous so now I’m going to have to do another needlepoint belt for him too! Anyhow, if you’re looking for great priced belt canvases go check out Mandy’s Needlepoint Belt Canvas’ on ebay. Her prices are half the price of most belt canvases out there and she will even do custom canvases for you. In fact, she is working on a custom belt canvas for me to work on for my mom, so I highly recommend checking her out. With school starting soon I will have lots of time in the carpool pick up line so that means I'll be doubling up on my needlepoint projects because they're so portable.


UPDATE: Hopefully ya'll can enlarge this one to see the belt a little better...