23 April, 2010

Cheese Straws

Today starts the kick-off to mini #1's First Communion weekend. We are all very excited and as you can imagine, I have a big reception planned following the ceremony. 17 family members are flying or driving in town (beginning today!) so I've pretty much been a crazy person this week preparing for it all. Naturally, that includes food, and what proper Southern event is complete without cheese straws???

Here's my recipe that is very simple. They turn out light and flaky without that spicy bite that a lot of other cheese straw recipe's have. Feel free to add more cayenne to spice it up if you prefer, but I that's just not how I prefer mine. *note: this recipe yields about 4 dozen

Ingredients
-2 cups all-purpose flour
-2 cups shredded sharp cheddar cheese
-3/4 cup margarine (I use it room temp)
-1 tsp baking powder
-1/4 tsp cayenne pepper
-1/2 tsp salt
-1/2 cup water

Directions

  1. Preheat your oven to 400 degrees F. I always put down wax paper or parchment paper on my baking sheets.
  2. Combine flour, baking powder, cayenne pepper, salt, grated cheese and margarine in a bowl and mix until well combined. Then add a little water at a time to make a stiff dough. I like to work it better w/ my hands at this point.
  3. On a floured surface, roll out dough pieces into desired thickness. Then using a paring knife, cut sticks into lengths (my sizes vary from 4"-10"). Use a spatula and arrange on baking sheet.
  4. Bake at 400 degrees for 5 minutes until browned (this is more like 7 minutes in my oven).

09 March, 2010

20 Minute Chops

Maybe someday my kids won't be suck picky eaters, but until that day arrives, I'm pretty much resigned to making multiple meals each night. To be fair, they HAVE gotten slightly better, I totally have to give credit to our school lunch lady, Ms. Rhonda. However, now that there's so much of Ms. Rhonda's food they'll eat, mine is always second best.

KIDS: Mom, what are we having for dinner?

Me: Taco's!!KIDS: OH GROSSS.. Ms. Rhonda's taco's are way better than yours.

Me: Well she gave me her recipe so they'll be exactly the same from now on. Isn't that great?!

KIDS: Mom. We know she didn't give you her recipe.

Sooo
, anyway. Here I sit playing second fiddle to the school lunch lady. But that's okay. Luckily, Mr. M will eat pretty much anything, which is a good thing because since having picky eating children, I no longer enjoy cooking. And not enjoying cooking + having to make multiple meals = inventing easy peasy good tasting recipes. Here's Mr. M's newest favorite that literally takes me about 20 minutes from start to finish.

Pear & Apricot Glazed Pork Chops

-Boneless pork chops
-Low sodium soy sauce
-Emeril's Essence (spices)
-Vegetable spray
-Jar of Pear & Apricot Preserves (mixed)

1) Marinate the Pork chops in the soy sauce and also put the Emeril's Essence on them.

2) Once marinated for about 30 minutes, I spray the skillet with vegetable spray, and cook the pork chops (You can also do this on your indoor grill or even outdoor grill. This is just the quickest way.)

3) When pork chops are almost done cooking, put 1 or 2 tablespoons (use to your discretion) of the Pear and Apricot Preserves on top of each pork chop.

4) I like to take the lid to a pot and put it over the pan at this point so the preserves will thin and get warmer quicker.

5) Once the preserves have warmed up and the meat is cooked through, that's it!

*Note* I always serve rice with this meal.

22 September, 2009

Homemade Flour Tortilla's

We used to have a restaurant chain in Atlanta called Rio Bravo Cantina. I know they made their way around certain parts of the country, but they were based out of Atlanta and what they were known for was their flour tortilla's. Soft, thick, and even a little gooey in some parts, Rio Bravo's flour tortilla's were tiny bits of Tex-Mex heaven on earth. Truly, nothing could get your salivary glands going like the smell of those tortilla's coming off the machine they used. So when Rio Bravo went out of business many years ago, Atlantan's everywhere mourned the loss of that delicious indulgence. I assure you, many a Weight Watchers diets were ruined over Rio Bravo's Queso served with piping hot tortilla's. Naturally, MM would have a suitable alternative, no?

You Will Need
4 cups all purpose flour
1/8 tsp baking powder
1/2 cup vegetable shortening
1 1/2 tsp sea salt
1 cup warm water

Instructions
1) Mix flour and baking powder together in a bowl

2) Add the vegetable shortening and mix it in with your hands until you get a coarse meal consistency.

3) Dissolve the sea salt into the water.

4) Drizzle the salt water mixture into the flour and mix with your hands into a soft dough. Add more warm water if it's not coming together.

5) Form the dough into a ball, put it in a bowl and cover for 20 minutes.

6) Break the dough ball into twelve pieces. Put a little bit of shortening on your hands and roll them into balls.

7) Flatten each ball out into a tortilla. Put flour on the surface before rolling them out. Get them as thin as possible. *TIP* Rio Bravo's tortilla's were on the thicker side, so I prefer not to roll mine out too thin, so I get that soft chewy consistency.)

8) Preheat a pan on medium heat. *TIP* A cast iron skillett works best for making tortilla's

9) Lay the tortilla on the pan and flip after 15-20 seconds. Bubbling is normal.

14 August, 2009

Boat Drinks


We are packing up and heading out to the lake with some friends for our last horrah with all the kids before school starts back next Thursday. Fingers crossed we'll have great weather!

All the food has already been prepared and packed up by one of the families coming along, so all the rest of us have to do is bring our kids, our stuff, and drinks for our families. Mr. Monogram and I have packed all the necessities we need to enjoy Arnold Palmer's all weekend (a preppy classic, as you know), and alcoholic Arnold Palmer's mean 3 things: Firefly Sweet Tea Vodka, Lemonade, and lots of ice. Oops! Can't forget my Tervis Tumblers!

Have a great weekend, everyone and I'll see you on Monday when I'll have a NOT TO BE MISSED product review for you by none other than the Mini Monograms.

03 August, 2009

Nutter-Butter Banana Pudding Trifle

Last night we were invited to some friends for dinner. We had the most delicious prime cut fillet's that were so delicious that even the kids were asking for seconds! Our hostess, Ann, had asked me to bring the dessert and I knew just what to bring. My Nutter-Butter Banana Pudding Trifle that is a HUGE hit. We ended the evening much later than we planned after a couple rounds of UNO with the kids where Mr. Monogram was the big winner. What a great evening!

Ingredients
  • 3 cups milk
  • 3 large eggs
  • 3/4 cup sugar
  • 1/3 cup all-purpose flour
  • 2 tablespoons butter
  • 2 teaspoons vanilla extract
  • 5 medium-size ripe bananas
  • 1 (1-lb.) package peanut butter sandwich cookies
  • 2 cups sweetened whipped cream
Instructions

1. Whisk together first 4 ingredients in a large saucepan over medium-low heat. Cook, whisking constantly, 15 to 20 minutes or until thickened. Remove from heat; stir in butter and vanilla until butter is melted.

2. Fill a large bowl with ice. Place saucepan in ice, and let stand, stirring occasionally, 30 minutes or until mixture is thoroughly chilled.

3. Meanwhile, cut bananas into 1/4-inch slices. Break cookies into thirds.

4. Spoon half of pudding mixture into a 3-qt. bowl or pitcher. Top with bananas and cookies. Spoon remaining pudding mixture over bananas and cookies. Top with sweetened whipped cream. Cover and chill 2 to 24 hours. Garnish, if desired.

Note: For testing purposes only, we used Nabisco Nutter Butter® Sandwich Cookies. For photography, we divided mixture between 2 (1 1/2- to 2-qt.) wide-mouthed pitchers.

Shortcut Suggestions: Omit eggs, sugar, flour, and butter. Substitute thawed extra creamy whipped topping for sweetened whipped cream. Reduce vanilla to 1 tsp. Place 3 cups milk and vanilla in large bowl; add 2 (3.4-oz.) packages vanilla instant pudding mix. Beat with an electric mixer at medium speed 2 minutes or until thickened; let stand 5 minutes. Stir in 1 (8-oz.) container sour cream. Proceed with recipe as directed in Steps 2 through 4.

*Note* I actually double the pudding recipe b/c otherwise the layers are too thin. You can also throw in a dash of coconut rum (I like Coconut Cruzan) for a little extra flavor. The longer you refrigerate it, the better it is!

source: Southern Living

12 June, 2009

Mii Cupcakes

I always try to make a fun cupcake to bring to school for the entire class when it's one of the mini's birthday's. And since the boys are really into the wii, *cougharen'tweall* I thought it would be fun to come up with a mii themed cupcake for mini #1's birthday in February.

In a perfect world, I would be talented enough to whip something like these together...

photo: Bakerella via Flickr

However, this is by no means a perfect world and as such, this was the best I was able to do. Cute, simple, and a HUUUUUUGE hit with the kids at school. To make it even more fun, I kept them a surprise and didn't even tell mini #1. I even did mii cupcakes for his teachers.


What You Need
-Your Favorite cupcake recipe
-Avery Label 5294, 2.5" round printer labels
-Toothpicks
-Sprinkles of your choice
-Computer
-Printer

Directions
1) Bake your cupcakes and let cool.

2) Meanwhile, go online to this site, and create a mii for each person you're making a cupcake for.

3) Either "Print Screen" and copy to Photoshop or Paint for each individual mii, or use a program like Jing (I recommend Jing) to save each mii you create.

4) Once you've created and saved a mii for each cupcake, open your word processing program with the layout for the Avery Label template, and insert each mii into two circles. The reason each mii needs to have 2 circles/labels is because you will need a front and back.

5) Print up your labels.

6) Your final step is sticking 2 labels together, back-to-back, with the toothpick in between so they are ready to be inserted into your cupcakes.

7) Ice and decorate your cupcakes, stick in your mii's and they are ready to go!

*NOTE* If you are doing a fair amount of cupcakes, then I suggest putting each person's name on the shirt of their mii. This can be done once you've inserted them into the label template, before printing up, but adding a text box and making the outline and filling invisible.

30 April, 2009

And They're OFF!

While I will sitting in the baseball bleachers watching the mini's back to back baseball games and not attending Derby Day this Saturday, a good friend of mine will. She is from Lexington and all about the gorgeous dress and big hat for this annual event. Maybe if I beg enough, she'll let me post some pictures, but no promises on this one, girls.


Still wanting to get into the spirit, I've decided the least I can do is make these delicious treats, clearly worthy of the winners circle themselves.

MINT JULEP CUPCAKES
{adapted from Cooking and Booking}

Ingredients:
Cupcakes

1 cup butter
2 cups sugar
1 1/2 teaspoons vanilla extract
1/2 teaspoon mint extract
4 eggs
2 3/4 cups flour
3 teaspoons baking powder
1 teaspoon salt
1 cup milk
1/2 cup bourbon (or whiskey)
1/2 cup Creme de Menthe

Icing
3 cups sifted powdered sugar
1/2 teaspoon salt
1 teaspoon mint extract
2 teaspoons vanilla extract
1 stick unsalted butter,
meltedmilk

Instructions:
Cupcakes

1) Preheat the oven to 350º F, and grease or line 30 cupcake cups.
2) Combine salt, baking powder, and 1 3/4 cups of the flour.
3) Beat butter, sugar, eggs, and extracts in a large mixing bowl until creamy.
4) Gradually beat in the flour mixture.
5) Add the milk and liquors to the batter, then the rest of the flour (1 cup).
6) Mix as little as possible, just until the batter comes together.
7) Divide the batter evenly among the cupcake cups.
8) Bake for 25-30 minutes, or until a toothpick inserted in the center of a cupcake comes out clean. Let cool.

Icing

1) Combine the powdered sugar, salt, extracts and melted butter and beat until creamy.
2) Gradually add milk until the texture is right for piping.
3) When the cupcakes are completely cool, pipe or spread the icing on top.
4) Garnish with cake sparkles or sprinkles, a straw (trimmed to size), and mint leaves.

photo & source: hostessblog.com

27 April, 2009

So Royal it Deserves a Crown

This past weekend was crazy. Not just crazy, INSANE. I'll get into that later in the week, but despite my crazy long weekend, I had some time to dash into the bookstore near my parents house while in Atlanta. And you know those theme table of books they always have set up (ie. sappy books for Mothers Day, inspirational books for Graduates, you get the idea) when you walk in the door? Well sometimes they suck and there is no cohesion to them (I mean really, my kids could do a better job putting together a table of books with a common theme, people), and sometimes there is a golden light glowing from one of those tables. Like a little halo, if you will. The table that was just made for you. Piles of new books with fresh, hard bindings waiting to be cracked open, just chock FULL of books that you want to devour. I found my table. To be fair, I found several tables and quite frankly could have wiped out our 401K at that bookstore but let's not be too hasty. We are in a recession after all and Mr. Monogram does work in the automotive industry (a moment of silence, please), so all I did was whip out my phone and start adding to my "Books to Read" list.


Here's one of them...

All glossy and shiny (and yes, gold!), this book has it all. A must have for any Martha wanna-be like me (and you). And while I didn't read the dedication in the book, I'm pretty sure it was written for me.

Now, while I've got you all thinking about cookies, it just so happens that a friend has asked for my Royal Icing recipe. What better time to share it, right? So here it is. I'll admit, I do less measuring with this recipe and more tasting. I go a lot by texture, weight, and taste, but just know you can't really screw it up. Oh, and don't forget as with any royal icing recipe, it's always best to keep your bowl of frosting covered w/ a damp towel to prevent it from drying out.
Ingredients
3 egg whites
1 lb confectioner's sugar (powdered sugar)
1/2 tsp cream of tartar
1tsp of flavoring of your choice (almond extract, vanilla extract, lemon extract, etc)
Instructions
1) Put all the ingredients in a bowl and beat on medium for a good 10 minutes or so.
2) You want the icing to form a good stiff peak, and become nice and glossy.

22 December, 2008

Festive Ribbon Brie

I'm still deaf out of my left ear and I'd be lying if I told you I wasn't incredibly concerned at this stage of the game. It's making for some miserable times for jolly 'ol Monogram Momma.

At any rate, my dear blogging buddy emailed me for a great holiday appetizer recipe so I had to share with her my all-time favorite. I do this every Christmas, and it's always a huge hit. Therfore, I'm passing it along to you, as you all scurry frantically through Epicurious and All Foods online, looking for a fresh appetizer recipe as well. Enjoy!

Festive Ribbon Brie
-1 ripe, round Brie cheese (8 ounces)
-1/4 cup butter, softened
-1/3 cup Sonoma Dried Tomato Halves, reconstitutedas package directs, drained and chopped
-1 small clove garlic, pressed
-1/4 cup chopped, toasted walnuts
-2 teaspoons chopped parsley
-Box of Puff Pastry (comes w/ 2 sheets)

Place wrapped cheese in freezer. Chill until firm but not frozen, about 1 hour. With sharp knife, halve cheese horizontally; set aside. Beat butter, then beat in tomatoes and garlic. Mix in walnuts. Spread tomato mixture evenly on cut side of one cheese half. Cover with remaining cheese, cut side down; press gently. Roll cheese on its side in parsley to coat tomato layer.

Next, roll out your puff pastry sheet really well so it will cover your entire brie. Place the brie in the center and cover it, making sure there are no uncovered parts of the brie. Seal those edges well w/ the tines of a fork so it won't come lose when cooking. Cover in an egg wash, then flip the brie over so the seams are on the bottom. Cover the top in the egg wash also, before placing in oven. Depending on your oven, put it in for 365-400 degrees for about 15-20 minutes (until it's nice and cooked but not oozing).

I also use some extra dough from the puff pastry and make a little holiday cut-out for the top of the brie so it's more festive and decorated.

24 November, 2008

Cut It Out

We are in full Thanksgiving prep mode here at the Monogram's (and by "we" I really mean me). As with every year since we moved away from our family, we host Thanksgiving and do a deep fried Turkey and lots of fabulous sides. Some traditional, some not so traditional. For instance, this year, Paula Dean's fried bacon mashed potatoe's will be on the table (no standard ole boring mashed potatoes for us!). But have I ever shared with you the correct way to cut a turkey? I don't think so, so here you go, just in case...


1. Place the chicken or the turkey (any size) on a cutting board with a trough to catch the juices. Cut through the crispy skin that connects the leg and the breast and slice down, pulling the thigh away from the bird. Continue until you reach the joint and cut through it to separate the leg.

2. Carve off the breast meat in one piece: Slide the knife along one side of the breastbone, as close to the bone as possible. Cut the breast off the carcass.

3. Place the breast meat on the cutting board and thinly slice. Transfer the meat to a platter (not shown).

4. Place the leg on the board and cut through the joint between the thigh and drumstick. Transfer to the platter. Detach the wing where it connects to the bird. Transfer it to the platter, then repeat steps on the other side.


Source: Real Simple


29 October, 2008

Pasta, anyone?

This is completely unrelated to Halloween or the type of thing I typically blog about, but as you know I've been trying to clean out some closets and organize Chez Monogram. In my efforts at organization, I realized I had two pasta machines. I have no idea why I have or need two, but I do. One is completely brand new, never used, never even opened the box. Therefore I'm putting it out here to see if anyone wants to buy it. It would make a fabulous Christmas gift as, like I mentioned, it's brand spanking new.


Yours for $49 + shipping

Retails on Amazon.com for $75 + shipping
This is a very heavy and sturdy machine. 150 mm Atlas pasta maker with flat lasagna rollers. Comes with 6 mm fettuccine and 1.6 mm Spaghetti cutters and adjusting knob with 9 numbered thickness settings. Removable cutting head, Interchangeable with optional attachments ( See Below ). A table clamp, Instructions and recipe book included. Dimension 6" x 7.5" x 7.5". Made in Italy by Marcato with 3 years warranty.

25 August, 2008


Did you know that yesterday was National Waffle Day? Probably not. Would you believe I got up at the crack of dawn and made homemade waffles for my family for breakfast? Probably not. Well it was and I, in fact, did not, but that doesn't mean we can't celebrate the delightful waffle today, does it?
No, no it does not.
Buttermilk Waffles
Williams-Sonoma says we should enjoy these waffles on their own, topped with our favorite syrup, or transform them into a luxurious brunch dish, Waffle Napoleons with Raspberry Cream. For that recipe, we'll will need to cook heart-shaped waffles. And don't we all just have a heart-shaped waffle maker sitting around for occasions such as National Waffle Day?

You Will Need
2 eggs, separated
1 cup buttermilk
5 Tbs. unsalted butter, melted
1/4 tsp. vanilla extract
1 cup all-purpose flour
1 tsp. baking powder
3/4 tsp. baking soda
1/4 tsp. salt
2 Tbs. sugar

Directions
1) Preheat a waffle maker according to the manufacturer’s instructions.
2) In a large bowl, whisk the egg yolks. Whisk in the buttermilk, butter and vanilla until blended.
3) Over a sheet of waxed paper, sift together the flour, baking powder, baking soda, salt and sugar.
4) Add the flour mixture to the yolk mixture and whisk until smooth.In another bowl, whisk the egg whites until stiff peaks form.
5) Using a rubber spatula, fold 1/2 cup of the egg whites into the batter, then carefully fold in the remaining whites.
6) Cook the waffles according to the manufacturer’s instructions. Makes eight 4-inch waffles.

01 May, 2008

Fins to the Left! Fins to the Right!

Tuesday night was book club, and while I won't do a full Book Club review on this book because I didn't really care for it, I just have to share what I brought for book club as my treat (everyone brings an appetizer or desert to share to the hosts home). The book we read was called Grayson by Lynne Cox. Long story short, it's a a true, coming of age short story (about 170 pages or so) of a woman who is a competitive swimmer and found a lost 18-foot baby whale off the coast of California when she was seventeen years old, training in the dark early morning waters off Seal Beach. The whole story takes place in the water with grouper, sting ray, plankton, sharks, and all sorts of other disgusting stuff in the ocean swimming into her for I don't know how many hours while she tries to help this baby whale find it's mother. I know it's gotten rave reviews and truly, I think would be better suited for a young adult reader, but personally I was just ready for this woman to get the heck out of the water already (I mean really, this book could have been a short story and published in a magazine. It really did not need an entire book).

Anyway, while I don't recommend the book, I DO recommend my treat I took. Y'all know me, when I see the opportunity for a theme I take it and run with it (or rather, swim with it in this case!)!

Beach Themed Cupcakes

You Will Need
-cake batter recipe (or box) of your choosing
-frosting recipe (or container) of your choosing
-blue food coloring
-either blue fruit roll-ups OR grayish-blue card stock

Mmmmmmmmmmm...
Here are my cupcakes fresh out of the oven


I colored my frosting blue, then slathered it on creating peaks with a butter knife to resemble waves. While I had originally cut my shark fins out of blue fruit roll-ups, they started *mysteriously* disappearing so I was forced to use a gray folder as my shark fins.


Pretty cute and tasty treat to discuss a book about the creatures of the ocean, no?

But wait! That's not all !!*in my best infomercial voice*

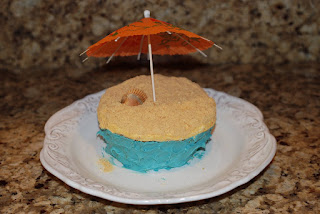
Now, one step further... I had some leftover cake batter and poured it into a small corning ware dish. I baked it to golden perfection and leveled the top of the cake with a knife. Once I'd emptied the cake out and let it cool, I decorated it to resemble....


THE BEACH!!
The base is covered in the same blue buttercream frosting I used for my cupcakes. The top is covered is plain white buttercream frosting and covered in graham cracker crumbs (from the box that you'd buy to make a crust with). Insert a fun drink umbrella and a broken seashell the mini's brought home from the beach and VOILA!


And I left it behind as a surprise with this little note for all my guys....


Another great idea from Martha.

10 October, 2007

Please tell Fall I'm looking for Him & He's Running Very Late!

With this ridiculously warm weather taking over the country this month, it makes it a tad difficult to get into the fall holiday spirit. I feel certain I’m not the only one, as it just isn’t as festive around my city and town this year as it typically is. Usually we’re donning our down vests, denimn jackets, and fleece pullovers by now, and as I type this I’m in a short sleeved tee and cropped jeans. This is my absolute favorite time of year, but yet I haven’t done a thing to get into the spirit yet or decorated the house as I typically do.

The same can be said for entertaining. It’s awfully difficult to want to whip out my chili recipe and start baking pumpkin seeds when it’s still in the 80’s outside. But luckily I stumbled on the perfect fall desert treat to compliment this unseasonably warm weather we’ve all been having. Naturally, we can all thank Martha for this one.


You Will Need
-4 navel oranges
-2 pints mango, passion-fruit, or orange sorbet, softened
-floral wire

Instructions

  1. Cut off the top quarter of each orange, and put to the side to use as lid. Using a grapefruit spoon or paring knife, scoop or cut out the inside of oranges. (Martha suggests reserving flesh for another use, such as fresh orange juice, but as much as I love Martha, lets get real and admit none of us are probably going to do that.)

  2. On a piece of paper, draw a jack-o'-lantern face. Tape the paper to your hollowed orange, and cut out features with a craft knife or paring knife. if you want, you can use an erasable marker and do it on the face of the orange, but just don't use permanent because we want this to look pretty.

  3. Finally, stuff each orange with the sorbet, and top it with a "lid" that you've been holding aside. Bend floral wire, and poke it in -- not through -- top of orange for the pumpkin's tendrils. Transfer to a baking sheet lined with parchment (wax) paper, and place in the freezer until firm, about 30 minutes. The great thing about this too, is that these oranges with sorbet can be frozen for up to 3 days.

05 June, 2007

Bag This Idea

Nothing quite says summertime like the ring of the bell from the ice cream man (or, ice cream "person" to be PC), heading down the street in his big white truck (although now that I'm a mother, why on earth do they always come around at dinner time? Can somebody please tell me this?). Who doesn't love that red, white, and blue Bomb Pop or the orange Push-up, the rainbow snow cone, or even the basic ice cream sandwich? With my affection for Rainbow Brite and Punky Brewster, I must admit I was a snow cone girl myself.


But still, nothing beats ice cream in the summertime. So that's why, when sister #2 passed this recipe along to me, I had to share it with you. Although it's the age of the super industrial Cuisinart ice cream maker à la Williams-Sonoma, I do recognize that not everyone owns this little gadget, but yet might still have the hankering for some home made ice cream. It's such a fun and simple way to make home-made soft serve ice cream, but yet without needing your own personal ice cream maker or ice cream man, for that matter.

Homemade Ice Cream in a Bag
From: Family Fun

Ingredients
-2 tablespoons sugar
-1 cup half and half
-1/2 teaspoon vanilla extract
-1/2 cup salt (The bigger the granules, the better. Kosher or rock salt works best, but table salt is fine.)
-Ice cubes (enough to fill each gallon-size bag about half full)
-1 pint-size ziplock bag
-1 gallon-size ziplock bag

1. Combine the sugar, half and half, and vanilla extract in the pint-size bag and seal it tightly.

2. Place the salt and ice in the gallon-size bag, then place the sealed smaller bag inside as well. Seal the larger bag. Now shake the bags until the mixture hardens (about 5 minutes). Feel the small bag to determine when it's done.

3. Take the smaller bag out of the larger one, add mix-ins, and eat the ice cream right out of the bag. Easy cleanup too! Serves 1.

Now, just remember, big white goofy looking ice cream truck and very loud high pitched little bell not included.

09 May, 2007

Sumertime Pizza's (When my "Type A" is a good thing)

There are so many yummy foods that are strictly reminiscent of summertime for me. Yes, that’s right. I like to make sure my “Type A” anal retentiveness covers all the bases in my life, including seasonal food (and no, it doesn’t make much sense to me either). For instance, hotdogs should only be eaten outside during the summer. Much like madras, the ice cream man in his little truck with the bell should not make an appearance prior to Memorial Day (nor should he be serving Bomb Pops past Labor Day). And grilled pizza is for- you guessed it- the grill in the summertime. And with the arrival of the warm weather, that’s just what we’ve been doing as of late. Homemade grilled pizza.


I love this treat. It is fun for everyone in the family, and even my picky little eaters, the mini monograms, have a great time making their own little pizzas. Now, the mini’s like their pizza in the oven, which I will also cover here, but Mr. Monogram & I enjoy our pizza hot off the grill in the summertime with fresh ingredients. The great thing about this is that you can do anything you want, but I will just cover our favorite (which is a breeze to pull together). My basic pizza bianca.

You will Need
-fresh ball of pizza dough (I buy mine fresh as opposed to making it b/c it always has more flavor and isn’t as dry)
-flour
-Mozzarella cheese
-Fontina cheese (just a little for flavor)
-Parmesan cheese
-Extra Virgin Olive Oil
-a nice Blend of Italian Spices (such as basil & oregano)
-garlic

First off, let me just go ahead and tell you that you will not become a World Pizza Throwing Champion with your first pizza. Of course I could be spot on wrong with this and you could totally turn out to be some pizza throwing prodigy, but just in case you’re not don’t say I didn’t warn you.

1) Spray your grill with a non-stick baking spray and then turn the grill on medium heat.

2) My ball of dough is so large I can get two pies from it. Once I split it in half, I add a little flour to the dough and use my hands to pull the dough in different directions, lay it on the counter (my counters are granite so I just a little flour on them) and continue to pull and push and just basically thin the dough until I’m happy with my shape, size, and thickness. Yes, sometimes I use a rolling pin and sometimes I do throw it up in the air because it really amuses the minis, but honestly it always ends up more egg-shaped than round so I only do that when they’re watching me!

3) Now that your dough is ready and the grill is warm, grab a large baking sheet with no lip or edges (just a flat cookie sheet) and spray that also. Put your rolled out dough on the cookie sheet.

4) Lightly brush on your EVOO, and then top with all your spices (and garlic).

5) Grab some tongues, your cheeses, and head out to the grill.

6) With your cookie sheet next to the grill, slide your dough onto the grill. Be prepared that this is not as easy as it sounds, and you will most likely have to use your tongues to adjust your dough on the grill. Also be prepared that your dough might not hold its original shape, but that’s fine.

7) So now your dough is on the grill. I leave it on there for a few minutes with the top open, and just pick up the edges to see if the bottom is slightly cooked with the grill marks.

8) Once the bottom is slightly grilled and slightly firm, you want to flip over the crust to grill the other side (which is actually the top, with the oil and spices). You can do this one of two ways. You can either slide the dough/crust onto the baking sheet again, flip it on that and then slide it back onto the grill, or you can very carefully use your tongues and gently flip it over using your hands.

9) Once it’s flipped grill that side so it’s only slightly grilled again (so it’s a tad crusty but yet still doughy on the inside), and then flip it BACK again so the top is actually the top again (the side with the oil and spices).

10) Top lightly with parmesan, then top with the mozzarella and Fontina. I use quite a bit of mozzarella because that’s how Mr. Monogram and I like it.

11) Close the top of the grill for roughly 3 minutes depending on your grill. Make sure you check on it and just lift up the bottom corner of your pizza to make sure you haven’t burned the bottom.

12) When the bottom is cooked to your liking, slide the pizza off the grill and back onto the baking sheet for easy transport and slicing.

Now, if you don’t have a grill or think this is too much trouble (although trust me when I tell you the taste is so amazing), then you can always pop your homemade pizza’s in the oven too. When I cook the minis pizzas in the oven I heat set it at 450°. The pizzas are pre-made with all toppings, then put in the oven with us just watching them until they are done (see photo).
Keep in Mind This also makes a great appetizer for guests when entertaining outdoors if you just cut the pizza up into bite-size pieces. However, also remember that this is not exactly low-calerie and you need to watch the amount of EVOO you put on your dough. If you think you've used too much, then just put a paper towel over your dough prior to grilling, to allow it to absorb some of the excess oil. Buon Appetito!

12 April, 2007

The $10K Grilled Cheese (why didn't I think of this?)

I’ve made it no secret that I love Paula Dean. I love her recipes as much as I love Martha’s crafting projects. Don’t get me wrong now, I do love Martha’s recipes, but often they are just too complicated and require too much time hunting down ingredients that my little Kroger just can’t promise me it’ll have. But typically, Paula’s recipe’s are not only gooey and delicious and full or butter (or completely fried in ohl) as is a true staple in Southern cooking (or cookin’ as Paula would say), they are typically very simple to whip together.


Now, Friday nights are pretty low-key in the Monogram household, yet it is a night we all really look forward to. We usually meet up with Mr. Monogram at our favorite Mexican place, then head home for some a quick game of Hullabaloo (or the dreaded Candy Land) before putting the boys to bed by 8. But once 10pm rolls around it is all about me & Paula’s Party. It is the one night during the week I stay up late. Each week she has a theme and as it so happens, last Friday was probably my favorite theme yet- Cheese! I admit this is not the smartest show to watch late at night because it will undoubtedly make you crave something you A) don’t need and B) don’t have but nonetheless it is my Friday night indulgence.

Back to the cheese theme. So on the cheese themed show last Friday night, there was a woman who taught Paula how to make her “Caribbean Grill” Grilled Cheese. This is not your every day American Grilled Cheese. Oh no, ma’am! In fact, it’s a $10, 000 grilled cheese sandwich because that’s how much money this woman won in a contest for the best Grilled Cheese in America. Not that the judges consulted my opinion or anything, but if they had they would know that yes indeedie it is well worth $10,000 in monogram momma’s mouth watering opinion.

Caribbean Grill

For the Mango Salsa
1/2 mango, 1/4-inch diced
1/4 red onion, 1/4-inch diced
1/4 red bell pepper, 1/4-inch diced
1 tablespoon fresh lime juice
Pinch sugar
1/2 teaspoon kosher salt
Freshly ground black pepper

For the Sandwich
3 tablespoons butter, at room temperature
1 tablespoon curry powder
8 slices fresh Italian bread (I used Sourdough)
1/4 cup honey mustard
8 slices Swiss cheese, (8 ounces)

Directions
In a small bowl, mix together mango, red onion, bell pepper, lime juice, sugar, salt, and pepper using a wooden spoon. Set aside until ready for use.

In a small bowl using a rubber spatula, mix the butter and curry together. Spread 2 tablespoons of the butter mixture on 1 side of each slice of bread. Place 4 slices of bread on your work surface, buttered side down. Spread the honey mustard on the other side of the bread. Place about 2 tablespoons of the mango salsa on the bread followed by the Swiss cheese. (You may need to fold the cheese slices to fit the bread.) Place the remaining 4 bread slices on top, buttered side up.

Add the remaining 1 tablespoon of curry butter to a nonstick skillet on medium heat for 2 minutes. Put the sandwiches in the skillet (in batches if necessary) and cover with lid and cook for 2 to 3 minutes, or until the underside is golden brown and the cheese has started to melt. Flip the sandwiches with a spatula and press very firmly, cook for 2 to 3 minutes, or until the cheese has melted. Turn once more, press with a spatula, and cook for 30 seconds. Remove from pan and let cool for 3 to 5 minutes. Cut diagonally and serve with extra salsa on the side.
Note: The salsa can be made 1 day ahead and refrigerated. Bring to room temperature before using.

I can truly attest to the amazing flavors of this sandwich, since we will be eating it tonight for the second time this week at Mr. M’s request mind you)! And while I am not a big fan of Swiss cheese, the flavor of the cheese completely transforms and changes so it doesn’t even end up tasting like Swiss cheese at all. But you know me, and I’ve got to add my own little tip in here, so for convenience sake, I did not make the mango salsa recipe above. Instead, I bought a fresh Mango-Peach salsa from the grocery store and used that. I was not disappointed and I don’t think you will be either! This sandwich is truly a treat.

21 March, 2007

Souper Carb Overload (Bathing suit season, here we come!)

Mr. Monogram is a meat and potato’s type of guy. And by meat and potatoes, I quite literally mean MEAT & POTATO’s. But sometimes I just do not feel like marinating a slab of beef (note: MM never just throws her beef or chicken on the grill or oven; it is always well marinated and prepared) and really, how many different ways can one make potatoes? At this point in our marriage I’m about 1 potato recipe shy of building a potato skyscraper for the next FoodTV challenge. Seriously. And honestly, and I’m really being honest with you and you know how I hate lying, I really do not enjoy cooking all that much anymore. *and we hear large gasps from the crowd* I know. Martha, if you are reading this, please don’t leave just yet, and allow me to explain myself.

I really used to love to cook and I LOVE reading recipes and finding new recipes and trying new things. But at this point in my life, being a SAHM with two very young little boys who are about the pickiest eaters this side of the Mississippi, I just don’t have the energy to spend hours in the kitchen prepping and dicing away. I just don’t enjoy it anymore like I used to (unless I’m entertaining and then you’ll find me in the kitchen doing everything from scratch starting two days prior). So that would explain my recent love affair with Sandra Lee (although she has no idea I’m currently having a love affair with her so it’s a bit one sided at this moment). So clearly, monogram momma is ALL ABOUT things being semi-homemade these days. I suppose if my children actually ate what I prepared or if my husband actually arrived home at the same general time each evening (coughOR EVEN CALLED TO SAY HE”D BE LATE), I would feel much different about this. Bitter, table for one, please! But the fact remains that short of the dog, who is not allowed to eat anything that doesn’t say “IAMS: Large Breed Adult Active Maturity Formula” on the bag, no one in my house really cares that I spent 2 hours preparing and making dinner and if I’m just more irritated by the time it’s all over, then why even do it?

So it really only makes sense that right now I am all about the crock pot and semi-homemade meals or anything that can be prepared in 20 min or less, compliments of Rachel or Sandra. But like I said, sometimes I just do not feel like marinating the side of a cow for Mr. Monogram, and let’s get real here (although don't misunderstand...I do love me some red meat too). Sometimes it just has to be about my needs too, right? So this is where my semi-homemade recipe came into play and it’s so delicious and sinfully easy (although honestly again, I won’t be going to confession over it), that it might appeal to a few of you out there. Now, do I think this is borderline tacky and below me? Perhaps. I’m still deciding that and will get back to you. But you know what? It’s not like I’m serving it to a dining room full of dinner guests on my fine china and sterling silverware and if it looks good and tastes good and I DID make it, after all, then maybe it isn’t so tacky after all for a Tuesday night dinner at home.

Quick Potato Soup Recipe

You Will Need
- 1 3/4 cups instant mashed potato flakes
-1 1/2 cups dry milk powder
-2 tablespoons chicken bouillon granules
-2 teaspoons dried minced onion
-1 teaspoon dried parsley
- 1/4 teaspoon ground white pepper
-1/4 teaspoon dried thyme
-1/8 teaspoon ground turmeric
- 1 1/2 teaspoons seasoning salt
- Handful of Bleu Cheese
-Chopped up chives to taste

Instructions
1. Combine potato flakes, dry milk, bouillon granules, onion, parsley, pepper, thyme, turmeric and seasoning salt in a bowl and stir to mix. Pour into a 1 quart jar to store.
2. To serve, place 1/2 cup soup mix in bowl. Stir in 1 cup boiling water until smooth. Once it’s all mixed, I also add in bleu cheese, a little mozzarella, and some chives. I also sprinkle some paprika on top when it’s all done too, just for a prettier presentation.

But I’m still not done. See, I don’t serve mine in a regular old bowl. Sure, I like my everyday china just fine, thank you, but I really prefer to serve my soup in a bread bowl. A bread bowl is my way of saying, “sure all I made for dinner was this semi-homemade soup, but I think enough of you to hollow out a whole loaf of bread to dump it in!” I mean, it makes sense, right? So anyway, you can use pretty much any type of bread loaf you like. I typically use a sourdough round from my grocer’s bakery. Using a pairing knife, I cute about a 4” diameter circle out of the top, then pull the top off. I then start pulling the insides out with my fingers, leaving about an inch or so of bread on the inner wall of the bowl. Don’t throw that bread away though! It can be frozen for making croutons or breadcrumbs in the future (heck, who am I kidding?! We usually feed ours to the ducks). Moving along, now that your bread bowl is essentially made, I spray some non-stick spray oil inside of it and rub in a little garlic as well. Pop that baby in the oven for roughly 10-15 minutes at 400 degrees until it turns golden brown, and you’ve got yourself a lovely little bread bowl with a yummy garlicky flavor that not only looks like you went to a whole lotta trouble, but it tastes like it too.

Okay, so I have to come clean with you guys. Sometimes, even my short-cut soup recipe is still a little too time consuming (WHAT?! Don’t judge, people! I’m very busy keeping up with all the Anna Nicole Smith babydaddy drama, you know). Yes, sometimes I literally have about 15 minutes to pull something together for Mr. Monogram. So in those emergency situations, what’s a momma to do? Well, this momma pulls out her Bear Creek Creamy Potato Soup mix. So what if it’s right out of the bag? I swear to you, this is a really tasty soup that can be ready in mere minutes and with some doctoring up, your own Mr. will never know it wasn’t actually homemade at all. *wink*

P.S Of utter importance if you use the Bear Creek soup mix is to remember to throw all evidence away!


P.P.S. In light of the fact that I am sans any camera equipment until my new stuff arrives, ya'll will have to either put up with whatever stock random images I can pull from the net or some lovely computer drawn illustrations. I thought you would prefer the first choice.

14 February, 2007

Treats for your Sweet

Unfortunately I do not have a whole lot of time for chit-chat this week (you've probably figured that out already though). Never fear, I’ll be back to my Chatty-Cathy little self by next week. But this week has me getting things pulled together for both mini’s Valentine’s Party’s, getting ready for mini #1’s 5th Birthday party (which is Saturday), and doing a thorough cleaning in every corner and crevice of the house since our family will begin arriving on Friday morning. Top this off with another potential private school visit too. So this week is a little hectic for me, as it is every year.

At any rate, I realize today is Valentine’s day and while some of you like going overboard for this holiday, other’s of you are probably like me, and just prefer something low key. So I thought I’d give you a few really simple but memorable deserts you can whip up for your someone special. And don’t fret that you don’t have the ingredient’s sitting on your pantry shelf. One quick stop into the grocery on your way home from work will provide you with everything you need, but yet not leave you standing on your feet for hours attempting to make banana’s flambé.

Chocolate Mousse Box
5 Hershey‘s® (or a higher end brand such as Ghiradelli if you prefer) chocolate bars (1 cut in half)
1/2 cup semisweet chocolate chips
Small plastic bag or piping bag
1 recipe chocolate mousse

Directions:
1. Melt chocolate chips in the microwave and pour into a small piping bag for “mortar.”
2. Use one whole Hershey’s® chocolate bar to form the base of the box.
3. Pipe melted chocolate along one long edge and press a second whole bar upright into the melted chocolate to form the back of the box. Hold in place for about 30 seconds until set.
4. Repeat using one of the half bars to form each end of the box. Pipe the melted chocolate along two sides of the bars to form the corners and set onto the base, making solid contact with the back. Allow time for each piece to set before moving to the next.
5. Finally, pipe the melted chocolate around the two ends and one long side edge of another whole chocolate bar and set it into place to create the front of the box. Let set. Box can be completed the day before serving.
To Serve: Pipe two spirals of your favorite mousse recipe into the box and gently rest the last chocolate bar on top to form the lid. Garnish with fresh flowers or berries.

Chocolate Balloon Bowls
1. Wash and sterilize a regular balloon. Blow up balloon to double the size of your fist and tie off (note: this picture shows smaller bowls than I recommend).
2. Melt any flavor chocolate and let cool to approximately 88 degrees. **Warning, if the chocolate is too hot the balloon will explode and create a mess*** I recommend melting chocolate in the microwave for 1 minute at 50% power. Always stir after each minute.
3. Hold balloon by the knot and dip halfway in chocolate. Roll balloon so it is coated well
4. Place dipped balloon on a wax paper or parchment paper covered tray and put in the fridge.
5. Once chocolate is hard 5 to 10 minutes, remove from fridge. Pop the balloon, which should peel right from chocolate and you have a beautiful bowl.
These bowls are a easy yet terrific way to wow and amaze your friends! Put a decadent mousse or pudding inside or even some homemade ice cream and it really creates a special treat.

Chocolate Custard Bags
1. Cut the top off of an unused, coated 1-lb coffee bag to a height of 2-3".
2. Melt semisweet chocolate chips in microwave (use my above directions and make sure to continuously stir!)
3. Using a pastry brish, apply several coats of the melted chocolate to the inside of the bag, allowing time to harden between coats. When fully set, peel the bag away from the chocolate.
4. Fill each bag with your favorite mousse or custard and garnish with fresh berries.
Happy Valentines Day!!

18 January, 2007

Talk About A Hat I Could Really Get Into!

Last Spring Martha did several different cupcakes but one show in particular caught my eye. I’m pretty sure it was the show in May (party month-my FAVORITE) when she did a pink themed party. And for this themed party, she had a desert bar. Naturally, on this decadent desert bar, were these amazing little cupcakes called Hi-Hat Cupcakes. Just look at that picture! I don’t even like chocolate but let me tell you, I’m willing to give it a second chance after seeing a picture like this. Coooooooooome to me, oh cupcake with the hi- hat on top!

Makes 12 Cupcakes

For the Batter
3 ounces unsweetened chocolate, chopped

1 cup all-purpose flour

1/2 teaspoon baking powder

1/2 teaspoon baking soda

1/4 teasooon salt

1/2 cup (1 stick) unsalted butter, softened

1 1/4 cups sugar

2 large eggs

1 teaspoon vanilla extract

1/2 cup sour cream

For the Frosting:
1 3/4 cups sugar

3 large egg whites

1/4 teaspoon cream of tartar

1 teaspoon vanilla extract

1/2 teaspoon almond extract

For the Chocolate Coating:
2 cups chopped semisweet chocolate (about 12 ounces)

3 tablespoons canola or vegetable oil

1. Preheat oven to 350° with rack in center. Prepare the batter: Place chocolate in a medium heat-proof bowl, and set it over a medium saucepan of barely simmering water; stir chocolate until melted and smooth. Remove bowl from heat, and set aside to cool slightly.

2. Meanwhile, whisk together flour, baking powder, baking soda, and salt in a medium bowl; set aside.

3. In the bowl of an electric mixer fitted with the paddle attachment, cream butter and sugar on medium speed, scraping sides of bowl as needed, until light and fluffy. On low speed, mix in melted chocolate. Increase speed to medium, and add eggs, one at a time, mixing well after each addition. Add vanilla, and beat until mixture is creamy and color has lightened slightly, about 1 minute. Mix in sour cream. On low speed, add half of reserved flour mixture, beating until just incorporated. Mix in 1/2 cup water. Add remaining flour mixture, and mix until just incorporated.

4. Line a cupcake pan with paper liners. Fill each liner with enough batter to come 1/8 inch from top, about 1/3 cup. Bake, rotating pans halfway through, until tops are firm and a cake tester inserted in the center comes out clean, about 20 minutes. Transfer cupcakes to a wire rack to cool in pan for 10 minutes.

5. Use a small knife to loosen any tops stuck to the pan. Carefully invert cupcakes onto the wire rack. Turn cupcakes right side up, and let cool completely.

6. Prepare the frosting: In a large heatproof bowl, combine sugar, 1/4 cup water, egg whites, and cream of tartar. Using a handheld electric mixer, beat on high speed until foamy, about 1 minute. Set bowl over a pan of barely simmering water. Beat on high speed until frosting forms stiff peaks, about 12 minutes; frosting should register 160° on a candy thermometer. Remove from heat; stir in vanilla and almond extracts, and beat for 2 minutes more until frosting thickens.

7. Transfer frosting to a large pastry bag fitted with a 1/2-inch plain pastry tip. Leaving a 1/8-inch border on each cupcake, pipe a spiral of frosting into a 2-inch-high cone shape, using about 1/2 cup of frosting per cupcake. Transfer cupcakes to a baking sheet, and refrigerate while preparing the chocolate coating.

8. Prepare the chocolate coating: Combine chocolate and oil in a medium heat-proof bowl set over a medium saucepan of barely simmering water; stir until melted and smooth. Transfer to a small bowl, and let cool about 15 minutes.

9. Holding each cupcake by its bottom, dip cupcake in the chocolate to coat frosting, allowing excess to drip off. Transfer to a baking sheet fitted with a wire rack. Spoon more coating around edge of cupcake and any exposed frosting; none of the frosting should show. Let cupcakes stand at room temperature 15 minutes.

10. Carefully remove paper liners from cupcakes, and discard. Place cupcakes on a serving platter, and refrigerate for 30 minutes to let coating set. Cover, and refrigerate for 2 hours more. Serve cold. Cupcakes can be refrigerated for up to 3 days.

Of course this recipe is just supposed to get your mouth watering and motivated to hop in the car to get what you need to make these little delectable treats, but if you want more creative cupcake recipes, then go pick up the book, Cupcakes! By Elinor Klivans & France Ruffenach. The entire book is full of gorgeous wet your whistle tiny little cakes, all very unique. These are not your mother’s cupcakes, I promise!

So now that you’re all motivated to throw on that monogrammed apron and head to the grocery to pick up exactly what you need. It is on my to-do list to day as well, so I’ll post pictures of how mine turned out later. However, in other sort of cupcake (well, just cake) late breaking news, set your Tivo’s and DVR’s because tonight begins the 2nd season premier of Ace of Cakes on Food TV and you all KNOW how I love that pimp my cake and light it on fire show! And if you think I'm kidding and need even more convincing, then go to the cake shop website and peruse their cake gallery (and don't forget to check out the "Fun Stuff" category!