


I was talking to my friend the other night, sort of reminiscing about the 80’s and a few of the crafty-type projects I did with my mom, sisters, and friends that really, I should not be admitting to. And we pretty much covered everything from the braided friendship bracelets we’d pin on our backpacks (or to the inner waistband of our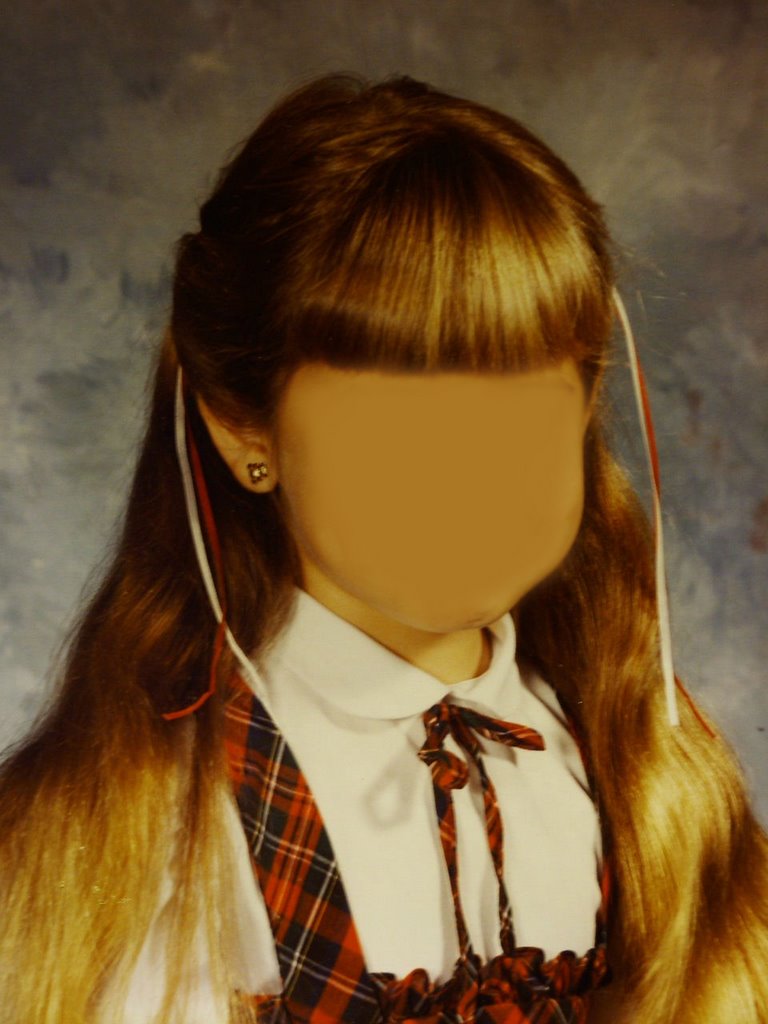 uniform skirts) to braid and then give to our friends (or whatever boy you were “going with” at the time), then the ribbon barrettes which were really early 80’s. Oh you know what I’m talking about. The one’s where your mom took a simple drugstore barrette and by knotting and weaving a thin satin ribbon through the opening and leaving a looooooooooooooooong tail of ribbon, topped of (if you were *lucky* like me) with a small bead or two at the bottom, created the most beautiful hair accessory you’d ever seen? Yeah, those are the one’s I’m talking about. They somehow made their way into nearly all of my elementary school pictures, coupled with either a monogrammed “C” sweater or a lovely little tartan plaid number with a ruffled collar. And you know exactly what I’m talking about too (in case you don’t you can see the inset school picture of me from who knows what year).
But then we moved onto slightly more challenging crafts in the 80’s, like découpaging baskets and making “stiffy bows.” My friend had no idea what I was talking about with this crafty project, but I have it on good authority that I was not the only one doing this so feel free to fess up in the comments and show yourself (but don't get the idea I was sitting home on Friday night's making stiffy bows either, as I assure I was not). But in case you don’t know what I’m talking about, or just don’t want to ad mit that you know what I’m talking about (again, I told you it was not one of my proudest moments in crafting), Wikipedia says it “…is the art of decorating an object by gluing colored paper cut outs (we also used fabric cut outs) onto it in combination with special paint effects, gold leaf, etc. Commonly an object like a small box or an item of furniture is covered by cutouts from magazines or from purpose-manufactured papers (again, I don’t know why we preferred fabric to cut out. Anyone?). Each layer is sealed with varnishes (often multiple coats) until the "stuck on" appearance disappears and the result looks like painting or inlay work.” So there you go. Découpage in a nutshell. But like I said, we glued it onto open mouthed baskets to hold magazines and laundry hampers and bread baskets. I mean, anything that stood still long enough was fair game to be glued with some cut out fabric flowers then slathered with a couple layers of Mod Podge. But the bow. Ah yes, the bow. That, my friends, was the crowning jewel on the top of the basket. I mean a découpaged basket is one thing, but to properly finish it off required making a bow out of the matching or coordinating fabric to your cut-outs, then applying a stiffening medium, and then loading it up with that Mod Podge stuff again. Ring a bell, anyone? *enter Ben Stein* Beuler? Beuler?
But back to the Mod Podge. Little did I know this little product would be reappearing in my home as it did last weekend when I decided to tackle decoupage again. You’d think I would have learned my lesson some 15 or so years ago but apparently not. I just can’t seem to leave the Mod Podge in the past where it belongs except now, I’m bringing you all along on t his little decoupage adventure with me. And it all started with Ms. Marye Kelly. I found her months ago, book marked her in my favorites, and promised I would return again when I had more time to give to her beautiful projects. And then Mrs. P and another blogger (I can’t remember who exactly because everyone was gabbing about mail for a few days there) started talking about the mail containers and I knew it was time to step up and figure out the project once and for all. Enough is enough of my procrastination so I popped my ADD med's and off I went. And you know what? It wasn’t as involved as I thought it was going to be and I found everything under one roof at my local Hobby Lobby so I know you can sit down and do this one too. So let’s get started.
Project Supplies 
-Bottle of Mod Podge (I prefer the matte to the high sheen finish but it’s your call)
-Foam paint/crafting brush (I prefer the 2” wide size for this project)
-Decorative Scrapbooking paper (I used the 12 x 12 sheets)
-Unfinished wooden trashcan or box (I got mine at Hobby Lobby in the unfinished wood project aisle)
-Ruler
-Computer/Printer
-Exacto knife
Let’s start with the trashcan or box. Now, I know a few of you have been eyeing the mail sorter boxes, but I didn’t need one so I didn’t do that. But the project is still the same. After checking around Hobby Lobby, I found this unfinished box that you could buy for your mail, or you can go to the floral department or even the paint department at Home Depot or Lowe’s and get a galvanized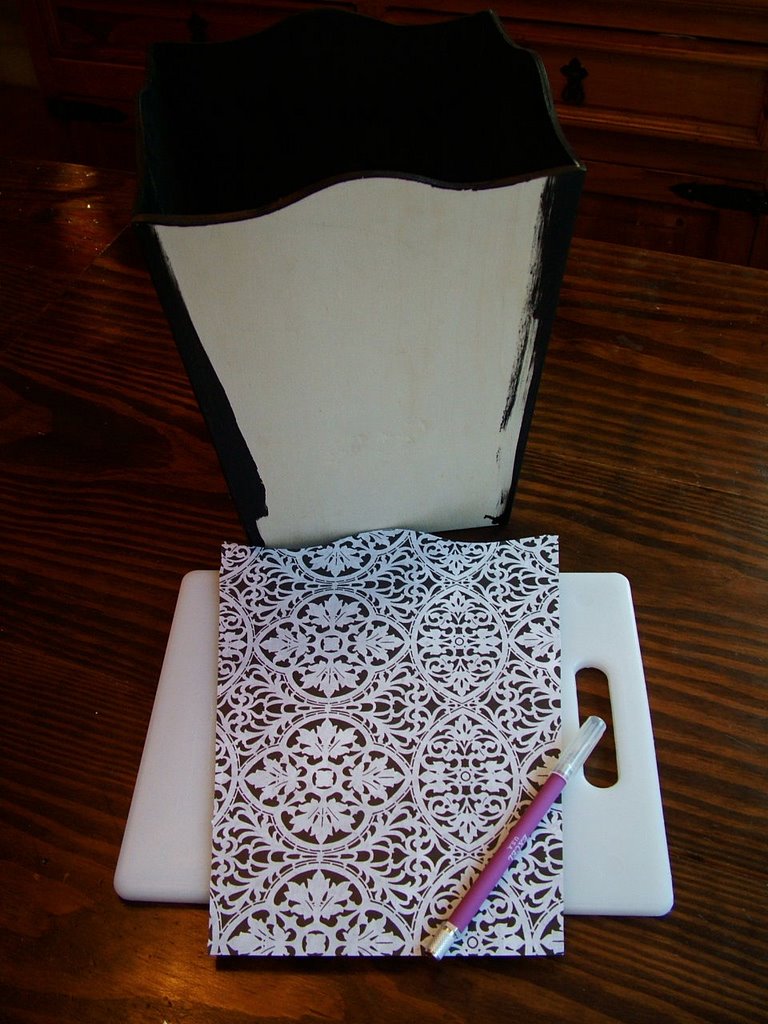 or copper container in the oval or round shape you want. If you really wanted, you could even buy a real metal letterbox from the home improvement store but honestly, I looked into that for you guys and if you’re going to spend the money for that then you might as well buy the pricey decoupaged one you want already finished. Back to the metal container or box. By drilling a hole in the backside of it, you then create a way to hang it on the wall if you so chose (always good to have options, you know!).So, let’s say you’ve purchased your box, tin cont
 ainer or trashcan as I have here, and now you’re ready to decoupage. To prep my trashcan for decoupaging, I first painted the entire inside and top edges black. While I was at it, I also painted the four corners black just in case my decoupaged paper didn’t perfectly line up. I mean, I am a novice here after all. But we obviously can’t decoupage without first printing up our monogram. So get out your ruler, and start measuring. This is the tricky part that is going to take some patience and trial and error. At least it did for me. I measured my trashcan, then created my monogram on the computer in Word. I then printed it up on plain white paper, and held the paper over my trashcan to see if it was positioned where I wanted it. When it was, I was then ready to cut my scrapbook paper. NOTE: Placing a cutting board underneath the scrapbooking paper will prevent you from making the fatal mistake of slicing right through your kitchen table. So then we lay the trashcan down on the scrapbook paper with is on top of the cutting board as you can see in the picture. Next, all I did was trace around the edges of my trashcan with my exacto knife, cutting the paper to the exact shape and size. Obviously, I needed to cut four pieces for each side of the trashcan. Because my printer is a bit temperamental, I then took my trusty blue painters tape and carefully centered one piece of my cut scrapbook paper to a plain white sheet of paper as shown here. Fed it into the printer, printed up my “M” perfectly centered, then carefully removed the tape and scrapbook page. Now, because this is going into the boy’s bathroom upstairs and that bath is all black and white w/ white beadboard, chair rail, and apple green walls, I wanted my “M” to be green. Oh it printed out perfectly positioned, but it wasn’t dark enough. So just keep in mind that if you don’t use black ink to print, that you might have to go over your monogram very carefully with a paint pen as I had to do. Don’t’ say I didn’t warn you.
After my 4 sides were cut out, I then just liberally applied my Mod Podge to the entire surface of the trashcan. I guess you can relate it a little bit to wallpapering. I tried to make edges meet as perfectly as I could, but remember this stuff dries fast so you have to wor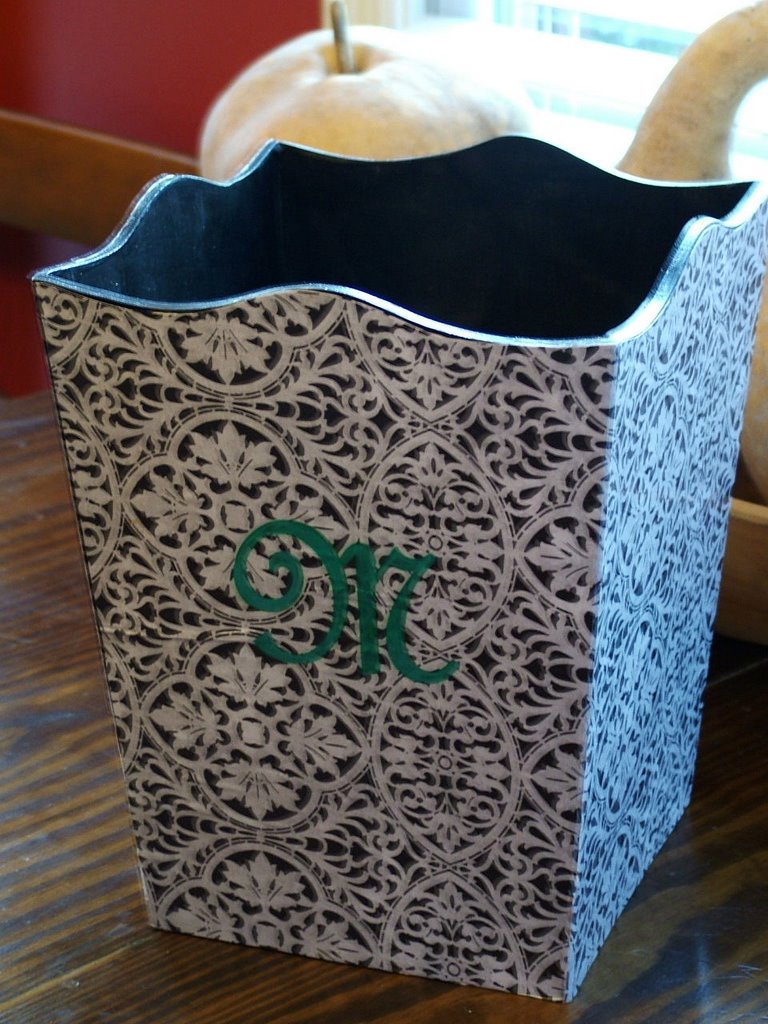 k fast. Keep smoothing the paper from bubbles. Yes, air bubbles will happen, it’s a fact I’ve come to accept with decoupage, now that I’ve done two projects. But once it’s all pretty well smoothed out and dried, then you completely cover each side again with the mod Podge. This will give it a really nice protective coat and finished look. Now, it will only take about 15-20 minutes for this to dry, so just keep coming back every 20 minutes or so to liberally apply another coat. I think I did about five until I was tired of it and closed up shop. But you can see the end result. Cute, right? I am pretty pleased with how it turned out and okay, so I have a few little places where my paper didn’t exactly meet up perfectly on the corners, but I’m happy with it and it looks really great in the bathroom!
But look, I hear you. You don’t need a trashcan, nor do you need a container to house your bills or mail. So I moved onto picture frames. I absolutely adore these Marye Kel ly frames, but I also knew I could do something similar. For the life of me I could not locate these exact frames, so I compromised and just made mine a little differently, but with an equally cute look I think. Your required supplies are the same as with the prior project, except instead of a tashcan or box, pick up a frame. I chose a simple but pretty high shine 9 ¾ x 9 ¾ frame with a large matte on the inside. A large matte is key to the success of this project so you have plenty of room to fit your monogram. So once again, start measuring. Measure your matte, but also make sure you measure the actual size of t
 he frame. Mine was 1-1/8 so when I configured my page size and borders in Word, I had to make my margin in word the same size as my frame border. IS this making sense to anyone except me? If not, then just email me because I’ve got to keep moving on this project. Now, just like before, I played around with my monogram and margins and printed up a few trail runs on plain white paper before printing it up on my pretty scrapbook paper. When I printed up my trial run pages, I held them up in front of the matte and then inserted both into the frame to check the position of the monogram before moving on. When I was happy with the position, I printed up my monogram (you can see I learned my lesson and printed it in black this time, too) on the scrapbook page.
So now the page is monogrammed. Great Job (give yourself a pat on the back)! So turn it over right-side down on top of the cutting board again (unless of course you are hoping for a new kitchen table and therefore trying to 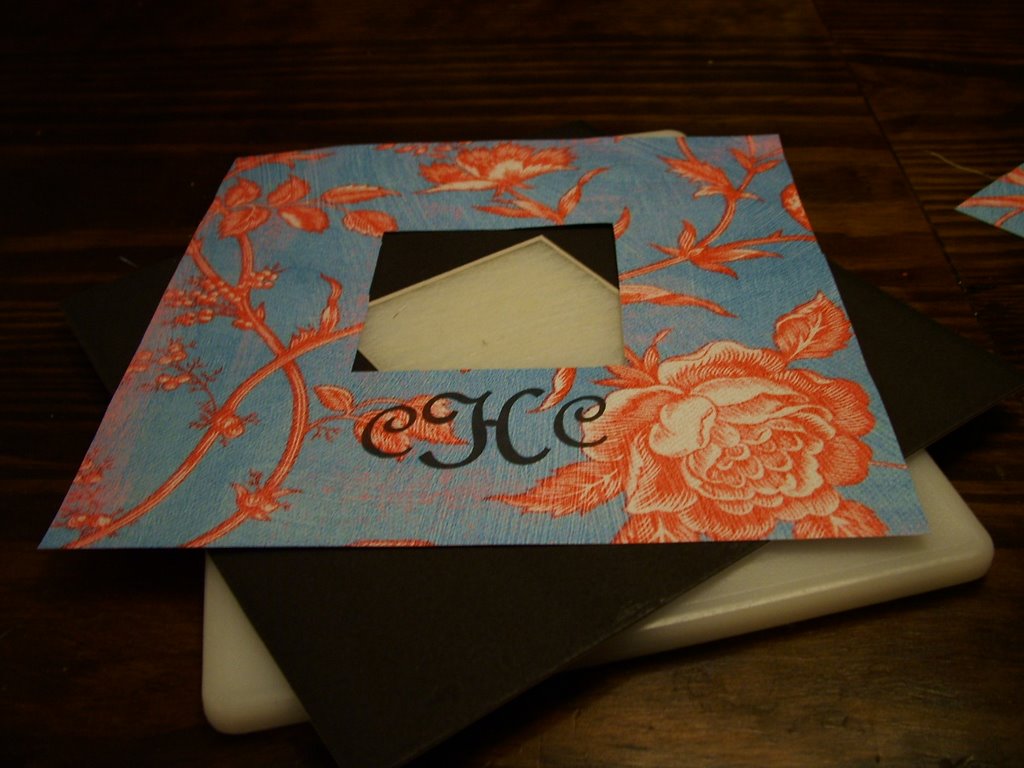 “accidentally” but purposely damage your current one…in which case you’re on your own there), then place the matte on top. Grab your exacto knife, and trim your page so it’s the exact size of your matte, and also slice out the inside hole of the matte which will show off your picture. Flip it all over and voila. It should be a perfect fit. And now all you have to do is like I described before. Completely cover your existing matte with the Mod Podge, position your monogrammed and trimmed decorative scrapbook paper, keep smoothing out the air bubbles and wait a few minutes for it to dry. Once it’s pretty dry, then you can start the process or co
 vering it over and over again with the Mod Podge like we did on the trashcan project before this one. And Voila! All done and looking cute as ever. But like I said; it’s not exactly like the Mary Kelly decoupaged frames and you can trim up any little fray paper pieces when they are dry and hard from the Mod Podge, but I’m sorry, these are seriously cute enough to be a great gift for someone at a significantly lower cost. Call me crazy if you want but if you ar eon my Christmas gift list this year, just know it's a real possibility that you will be receiving one of these (of course, I will make sure it compliments your decor and color scheme though so not to worry).
Now, to finish up I have a few little tips. My first tip, is really just a suggestion. You don’t have to use scrapbook paper as I did. It just so happens my Hobby Lobby has so many really pretty decorative papers, that I really wanted to use, so I went that route. Of course, a 40% off coupon always mak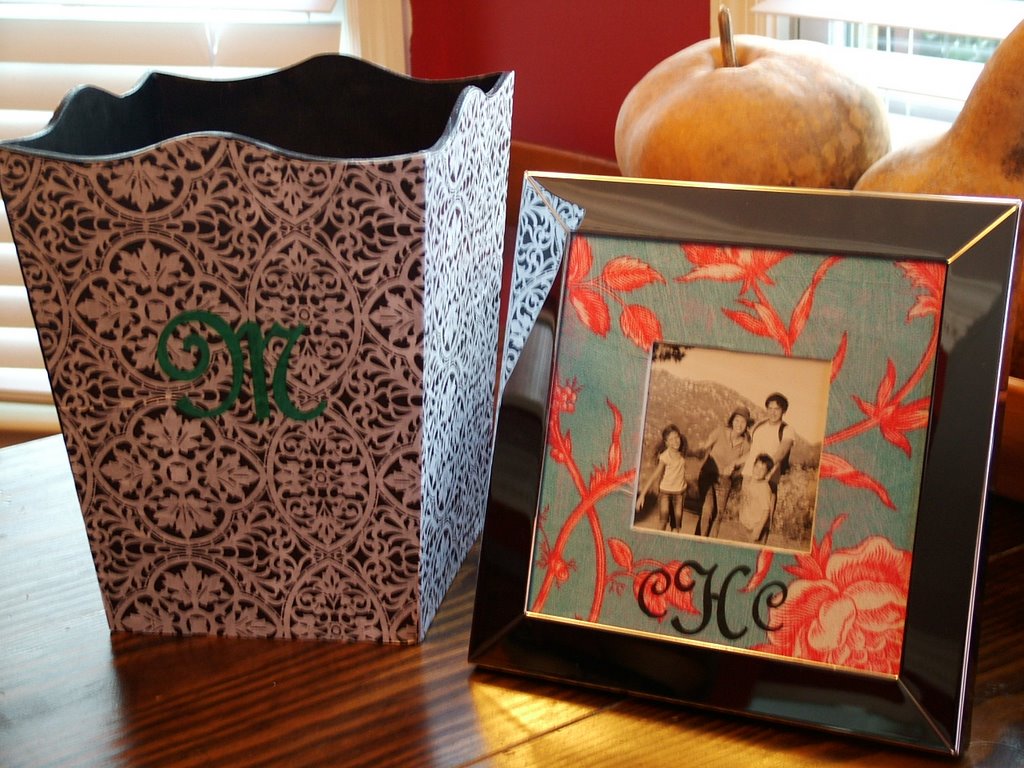 es things a tad more appealing too, but that’s beside the point. But you can go to a scrapbooking store for more paper, or even use wallpaper if you want. Go to a wallpaper store and ask for remnants or use left-over wallpaper you may have that you really like. Or still again, how about fabric? You can always use fabric for this project too! Decorating a nursery? Then use some of your coordinating fabric to create a really pretty, personalized frame for your nursery. And not to point out the obvious, but if you use fabric, you will obviously not be able to print on it. So you have two options. You can either buy fabric pens and use the transfer paper to transfer your monogram on it and then go over it with fabric pens or paint pens, OR, you can pick up printable iron-on transfer paper that slides right into your printer and prints up your design for you. You then cut your design out of this special paper, then iron it on (you can buy a generic version for about $10 if you check your local office supply store too). Very simple!
Long story short, this is a pretty simple project that really anyone can do. Even a teenager or pre-teen can do this with some help with the measuring and positioning. And now, with another project completed at the Monogram household, it's time for me to move onto children's holiday attire, and send you off to find your own adventures in decoupage.
15 November, 2006
Back to the Future: Adventures in Decoupage
Posted by Monogram Momma at 3:10 PM
Labels: Home Decor, Preppy Projects
Subscribe to:
Post Comments (Atom)


22 Comments:
Wow! Your stuff looks great. I liked reminiscing about the old time crafts, but I didn't embrace crafting until much later, so I had to just envy others.
These look like great ideas & I think I had the same tartan outfit and ribbon barrettes!
Yeah! I have my modpodge and about everything else, but I can't find a proper mail tin anywhere! Any ideas? I have tried Michaels and Hobby Lobby. :(
Thanks, guys! Mail tin resources... World Market in the basket and container section, Pier 1, & try JoAnn's in the dry floral department and wedding department too. My Hobby Lobby and Michaels also has tons but they aren't in real obvious places. Basically, you are looking for a galvanized tin and you could proabbly find one in a different size too at Home Depot or Lowe's in the paint department as mentioned in the post. Also check at HD or Lowe's to see if they have an inexpensive real letterbox/wall mailbox that you could use. All the ones I saw online were pricey to use for a project like this but you may have better luck in the store. If that doesn't work, let me know. I'm going to JoAnn's tomorrow to scope out fabrics so I will look for you and take a few pictures of what I find. I don't know what part of Atlanta you live in but I do know the JoAnn's at Northpoint is great.
P.S. Remember you are probably going to have to be a little flexible with the size and shape of your mail tin and really any container, even wood, will work! ;-)
Your stuff turned out great. I especially love the frame! I may have to try that one. It really is a great idea for Christmas gifts. Thank you for all your effort you put into your great posts!
Hi Monogram Momma, My first time to post here, I am Bossy Bar-Wife's coworker and also her monogrammer. She got me to start my own blog yesterday so I am excited to be able to chime in now. I actually bought some of those frames at Marist Craft Fair this weekend. They are super cute and I am sure the girl makes them the same way you were saying. I think she used 2 pieces of glass clipped together. I am 1/10 crafty so I'll check it out and let you know. Thank you for my daily entertainment!
I think my Michael's and the random Hobby Lobby I went to were overrun with Christmas stuff. They looked all over for me in both. :( I will check Joanne's that has always been my favorite! ;) I did find a good tin to make a recipe box! Everyone is getting homemade Mrs. P presents this year!
You are just sew crafty. I knit and a few other things but your ideas and projects want me to try other things.
Ok, that's a super-cute craft! I am filing it away for the new year when I'm not snowed under with Christmas stuff.
Amazing how you and I probably didn't go to the same school or anything, but you described me right around 5th grade down to the monogrammed sweater! My Girl Scout troop leader was up on the trends and we actually spent several weeks in troop meetings braiding those barrettes in many, many colors...I still remember the thrill when she emptied out the bag of ribbon from the craft store on to the table! Naturally, I had about 10 sets of those barrettes to match my monogrammed sweaters with coordinating plaid pleated skirts.
Did you all do friendship pins? Little safety pins with beads for your shoelaces--the more you wore, the more friends you had?
Sure beats what the 5th graders are wearing now.
Pretty!
Whoa, those stiffy bows are a blast from the past - we used to make those all the time and put them on baskets! Guess it's time to break out the Mod Podge again!
As soon as the dust settles from my move I'm definitely going to make this and go through your other project archives - looks like its going to be a crafty Christmas!
Those friendship bracelets are still really in. My elementary-school aged cousin made some for me this summer, I wore them proudly to the beach as anklets.
I decoupaged my coffee table in college with photographs of my friends - everyone loved searching for themself when they came over.
See what happens when I don't pop on to respond to your comments? I get totally backed up! I wish there was a way to incorporate instant messenger into the blog!
Melissa: Thank you! I enjoy the posts and clearly, some of them take more times than others but I too will be giving these frames as christmas presents to the mini's godparents!
Sew Sally: Welcome! I'm glad you are here and please comment whenever you like!
MrS. p: I just retruend from JoAnn's and will email you picts of all the stuff I found for your mail tin.
Suburban Prep: I WISH I could knit! I am really not good at it although I've had many attempts at it! Let me know if you'd like to do a guest blog on knitting!
Amy G: Of course, the friendship pins. How could I forget?!
Susan: FINALLY! Someone else who is willing to admit they made those stiffy bows! Thanks for the courage to admit that.
Suz: Good luck with your move and more crafty Christmas stuff heading your way soon!
Oh, I still mod podg like it's no one's business
Wow, MM! This is one of you most impressive posts to date. I really need to get in gear. I did used to love Mod Podge when I was in junior high. I did a lampshade with faces cut out of magazines- it was actually pretty cool. Maybe I'll try it again!
Gina at Touch of Whimsey Designs asked me to send you her email address because her inbox at Ebay timed out and she wanted to get in touch with you to thank you for posting about her site.
sopranostar@bellsouth.net
Thanks, Sarah! I'm glad you liked it!!!
Suz: I will email Gina now! Thanks for passing the message along!
Look at you little miss crafty -- I am most impressed. Your projects look fabulous!
Well, you inspired me! I'll have to wait until they are completely dry to e-mail pics, but I found the frames like the Marye Kelly ones at Michael's. They're pressboard, which makes them idea for decoupage, and they hold a horizontal 4x6 frame. I'm pretty happy for my first decoupage projects...or at least my first in this century! :)
Welcome back, Mel! Glad to see you've found your way out of the boxes and bubble wrap!
EllieBee I can't WAIT to see your projects! Email them when they're dry! I'll have to re-check my Michale's b/c mine didn't have these frames. :-(
OMG! Stiffy Bows!!!! LOL that is one I haven't thought about in years. My dd (who is 15) would probably get a huge kick out of that...just not with the floral Laura Ashley or Waverly inspired fabrics...maybe dots or plaids or stripes?
Post a Comment