


I have a confession. Up until last week, I have always been what one could call, a pumpkin snob. Yes, that’s r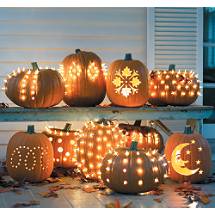 ight, a pumpkin snob. Like Christmas trees, I believe they should all be real so you can enjoy every aspect from their texture to the smell, the gooey-ness of cleaning out all the seeds and baking them for my favorite fall snack, and even experiencing the frustration that comes with the design and implementation of carving a real pumpkin (I mean I think we can all agree while the finished project is very rewarding, there is a lot of time and often irritation that goes into carving these suckers. Ever try to carve out the delicate eye or tooth of your pumpkin person only to pop out then entire thing so you’re left with a big gaping hole?). I would see the synthetic crafting pumpkins at the craft store and on other peoples doorsteps and think, “Heavens no! Not for me!” and turn my nose and walk away. But like I said, that was before last week and a new day has come and I’ve got a table full of these crafting carvable pumpkins to prove it.
And so begins my Pumpkin series as has been requested by many of you, eagerly seeking out pumpkin ideas. I will be chatting about everything from these carvable synthetic crafting pumpkins to real pumpkins to different types of pumpkins and decorating and baking with pumpkins. In short, no pumpkin, big or small will be ignored because you know I do like to make everyone feel included as there is no snubbing allowed at monogram momma’s. It’s all about equality here.
So I pi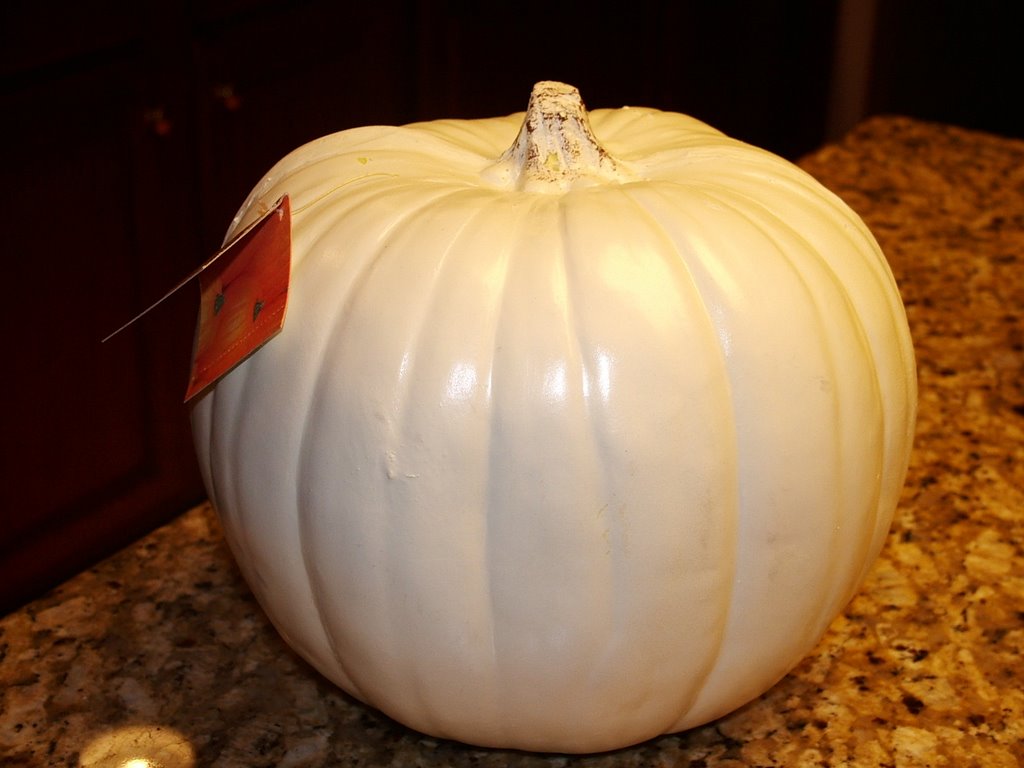 cked up a white synthetic pumpkin when I bought all the other because I don’t know, I just felt like a little diversity was needed among pumpkin crafting. These pumpkins I believe are called “ghost pumpkins” and I had no clue what I was going to do with it but it made it’s way into my cart none-the-less. Naturally, I monogrammed it. In fact, I made an executive decision that Mr. Monogram’s office wasn’t looking very fall-ish (truthfully the only thing it looks is B
 ORING-ish), so I decided to monogram it for him. And since his company colors are green and white, it worked out rather well with the white pumpkin and green monogram. As with all of my monogramming projects, I printed up my monogram from the computer then used my carbon paper to trace it onto my pumpkin while securing it with my faithful painters tape. Then I just used my green paint pen and went to town. Once my monogram was done, I then used a knife and cut out the top, as you would with a real pumpkin, and I decided to fill it with candy for guests. So now Mr. Monogram has a lovely monogrammed ghost pumpkin in his company colors for the coffee table in his office, whether he likes it or not. But you and I both know the only way this pumpkin is going to find it’s way to it’s final destination is if I take it there myself, so believe you me, we are on our way today.
Once I finished my monogrammed pumpkin, I then decided to tackle a slightly larger project. Say it with me: TOPIARY. Yes you read that right; with all our rain this weekend I had loads of time to work on a lovely three- tiered pumpkin topiary. Here’s what you need to get started on this idea:
Supplies
-3 synthetic pumpkins (I did a small one for the top, then two medium sized ones)
-various synthetic flowers, wreaths, leaves, birds, etc. (basically whatever you want to use that will go with your décor)
-Hot glue gun with plenty of glue
-kitchen knife or electric pumpkin carving tool
So let’s get started. Obviously you will want to stack your pumpkins one on top of each other. So what I did, was to take the middle & 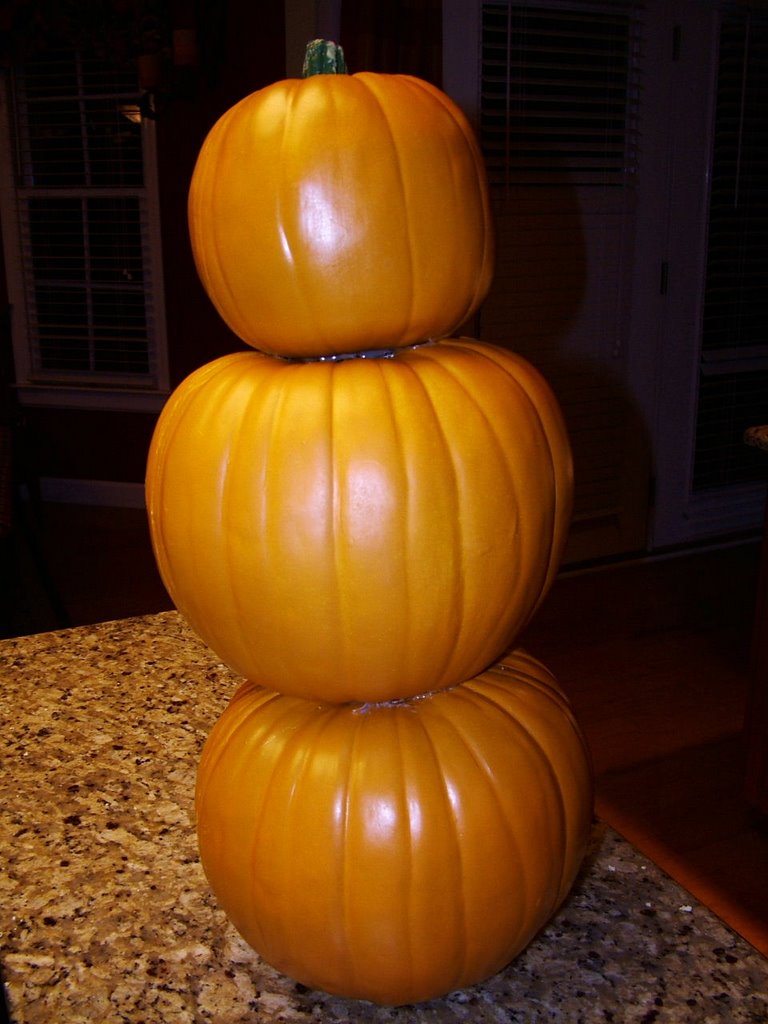 top pumpkins and cut a hole out of the bottom. That way they stack very nicely and the stem from the pumpkin underneath it, goes into the hole. Kind of like a male and female pumpkin. You can see here what they looked like when I cut the bottom out. I then m
 ade sure my glue was nice and hot, then just secured the three pumpkins together with my glue gun. Now, you can see here that I took apart all my synthetic flowers and made them into small stems and pieces and just sort of organized them a little bit into similar groups. I used deep purple berries and green ranuncula’s from the Tuscan floral series from my local craft store as that was going to match my décor the best. All I did then, was just work one layer at a time, gluing and inserting flowers and leaves and berried and t
 wigs. Once I got to the top layer, I decided I just wanted to do a little leaf and top it off with a flower, and that was it. I will say, while very easy to do, this does sort of make a mess because the flowers get everywhere.
I made mine with the intention of being my kitchen island centerpiece as I always like to have something there this time of year. To finish it off, I will put it on a round silver platter sitting on a layer of coordinating leaves and surrounded by a nice rich color combination or cranberries and whole coffee beans. And if I really wanted to, I could always do two and put one on each side of my mantle for a nice looks a s well. But the great thing about this topiary is that you can also make it to go outside. Yes, that’s right! They can withstand the outdoor elements! For instance, I have two large planters at my front door that usually have metal topiaries and summer vines in them. However, you can see here that by removing that and putting my pumpkin topiary in its place, it makes a very festive fall entrance to my home. Of course ignore the dying flowers surrounding it, as I haven’t had time to put my pansies in yet, but you get the idea. Take out your dead summer flowers, put in a nice pumpkin topiary, and surround it with some colorful pansies and draping ivy, and you’re front entry will look fabulous. Now, I did not monogram this, but if you like, you can even do your one letter initial in a nice formal font on the center pumpkin of the topiary, and that would also look very nice on each side of your front door. But since my door basket is monogrammed, that would just be too many M’s for my front door, so I will leave my simple and plain.
Being that these pumpkins are synthetic, you can not put a candle in them. But that’s okay because you know I’ve got that figured out already! So here’s another cute idea. If you have a short (or even fairly short) last name, get one small size pumpkin for each letter in your last name. Use a 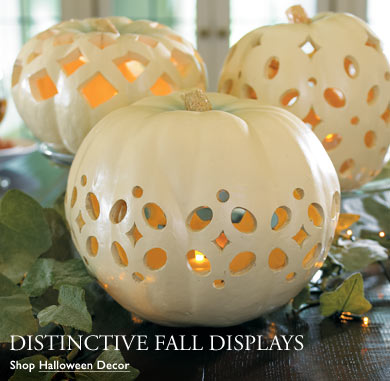 pretty font like the Edwardian and print up letters for your last name. Trace them on each pumpkin and cut them out. Line them along your mantle perfectly spaced. If you like, you can put small tea-lights in clear glass tea light or votive holders in between each of the pumpkins to light when company comes over. But if you want to put light actually inside the pumpkin, then try small strands of Christmas lights. Poke a hole through the back of each individual pumpkin so you can discretely slip the cord out and connect it from one pumpkin to another. If you still like the idea of spelling out your last name for your mantle or front walkway or even your front entry stairs (one on each stair going down the stairs), but don’t want to insert the lights, then how about flowers? You can put small clear glass vases inside each pumpkin after cutting a hole out of the top, then fill it with fresh flowers as well!
So I hope you've Finally enjoyed seeing the pictures. It only took Blogger an entire day to allow me to upload them so I hope they were worth the wait. Now, if you'll excuse me, I've got two little pimpkins remaining with the mini monograms names on them for me to personalize for their bedrooms. Happy carving!
26 September, 2006
Pumpkins 101
Posted by Monogram Momma at 10:28 AM
Labels: Halloween, Home Decor, Preppy Projects
Subscribe to:
Post Comments (Atom)


7 Comments:
This is so great! I bought a couple of those pumpkins myself last week, and have been wondering what to do with them! MM, you always come through for me. Thanks!
MM, when you say "paint pen" what brand are you using? I went to the craft store last week and looked around for an hour and found nothing. Will you share your brand name of paint pens with us? thanks
I'm anxiously awaiting your tailgating post... from another southern football loving girl I can't wait to hear all your good ideas.
Kiki: I have found the best paint pens to be from Michael's craft store. They are good for leather or wood or pretty much any surface. The brand is called "DecoColor"
oh honey- that topiary is just incredible! you have turned me to the ways of the synthetic!
I just love the monogrammed pumpkin - that would be such a cute centerpiece on my kitchen island... hmm, you may have me convinced to try my hand at craftiness....
What an imagination you have!!! You are incredibly talented!!! I LOVE to carve pumpkins, too but I don't know where to find these synthetic ones since we're not in the season. Can you tell me where to get these??? I look forward to seeing more on your site. Have fun, you've found your niche!!!
Charlene
Fenton, MO
Post a Comment