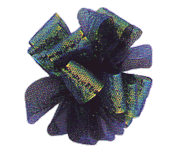
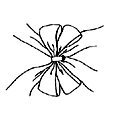
If you want to learn how to do something new, then arguably the best place to get that information is from the best source. So in all my decorating and bow making (or attempted bow making) this past weekend, my quest to learn how to make the perfect holiday ad floral bows led me straight to the Offray Ribbon website where they've laid out a very convenient how-to guide. But don't worry, I won't make you search all over for it. You know monogram momma's got you covered. So whether you're wanting to tie some pretty bows for your holiday packages, make some big puffy and pretty floral bows for your wreaths or garland, or heck even if you find yourself fighting the urge to hog tie your own mini's in the coming weeks, at the very least you'll be able to tie them up decoratively, right?
Florist Bow
MATERIALS (for one)
-3 yds. ribbon 
1. 8" from one end of ribbon, pinch firmly between thumb and index finger 2. Make a 5" loop (half the size of finished bow) pinch tightly. If ribbon is one-sided, twist length to right side. Make second loop and pinch over first two
pinches.
3. Repeat this process forming 4 loops on each side
4. Make a center knot by forming a small loop over your thumb, pinch and wire all loops together, trim excess. Wire 14" length to back for tails
PomPom Bow
MATERIALS (for one)
-5 yds. ribbon
-Small piece of wire 1. With ribbon, form a 9" loop equal in size to the diameter of the finished bow.
 2. Wrap remaining ribbon around loop as many times as is desired for bow.
 3. Flatten loops and cut off triangles at end, being careful not to cut too close to the center.
 5. Secure ribbon at center over notches with wire. Pull out loops, twist towards center, alternating sides to form pompom
Starburst Bow
MATERIALS (for one)
2 yds. ribbon

1. Form a loop about 5" long, pinch between thumb and index finger.

2. Bring ribbon down and up to form a bottom 5" loop. Repeat to form second set of loops. Cut off excess ribbon and wire center tightly.

3. Cut two 14" lengths and one 5" length. Gather 14" lengths at centers and wire to either side of bow.

4. Glue 5" length around center, fold the long end in if necessary
-2 yds. ribbon


4 Comments:
I love the "Dior" bow!
Abra-bow-dabra.
Thanks for the lessons.
Love you blog.I found you through my friend Lisa Sarosi here in Charlotte. Her sister in law Meg links to your blog. She ordered Monogrammed placemats from my new company MADISONSLOAN. After reading your blog I think you might like them. I would love feedback and comments.
Thanks,
MaterialGirl
Merci beaucoup for this how-to post! Who needs Martha Stewart when MM is here to show the way!
Post a Comment