


And that brings me to the topic of the day. So let’s start chatting about proper table setting etiquette and for the piece de résistance, I’ll give you a little peek at my thanksgiving table centerpiece and tell you how you too, can whip it up yourself in no time flat for either Thanksgiving or even Christmas.
Naturally, I headed straight over to the grand master of etiquette, Emily Post. And in case you didn’t know, there is actually an Emily Post Institute where you can take etiquette classes and learn all sorts of useful etiquette tips. Just something to keep in the back of your mind. I don’t know about you but I sure do know a few people who could stand a few days of classes from the EPI. Anyway, not the point. The point is, you will either be using a Basic Place Setting (which is your everyday setting), an informal Place Setting (what you would set if you were hosting a nice informal dinner party or casual holiday), or a Formal Place Setting (if you’re expecting President and Laura Bush, then I would opt for this one). So, since I am not expecting President and Mrs. Bush and it’s just going to a be a casual Thanksgiving this year with us enjoying our deep fried turkey (yes, I did just say DEEP FRIED), I will be setting my table informally. And just to make things easy, I’m going to lay it all out here for you to choose your preference for your holiday table, just as they’ve so nicely laid it out for us over at the Emily Post Institute.
For a basic table setting, here are two great tricks to help you – or your kids – remember the order of plates and utensils:
1) Picture the word “FORKS.” The order, left to right is: F for Fork, O for Plate (the shape!), K for Knives and S for Spoons. (Okay – you have to forget the r, but you get the idea!)
2) Holding your hands in front of you, touch the tips of your thumbs to the tips of your forefinergers to make a lower case ‘b’ with your left hand and a lower case ‘d’ with your right hand. This reminds you that ‘bread and butter’ go to the left of the place setting and ‘drinks’ go on the right. Emily Post could have used that trick – she was often confused about which bread and butter belonged to her—and sometimes she used her neighbor’s! In which case, when it was called to her attention, she would say to the dismayed lady or gentleman, “Oh, I am always mixing them up. Here, please take mine!”
3) Some other things to know:
-Knife blades always face the plate
-The napkin goes to the left of the fork, or on the plate
-The bread and butter plate and knife are optional
Informal Place Setting
When an informal three-course dinner is served, the typical place setting includes these utensils and dishes:
Our illustration shows how a table would be set for the following menu:
Soup course
Salad or first course
Entrée
Dessert
a. Dinner plate: This is the ‘hub of the wheel’ and is usually the first thing to be set on the table. In our illustration, the dinner plate would be placed where the napkin is, with the napkin on top of the plate.
b. Two Forks: The forks are placed to the left of the plate. The dinner fork, the larger of the two forks, is used for the main course; the smaller fork is used for a salad or appetizer. The forks are arranged according to when you need to use them, following an ‘outside-in’ order. If the small fork is needed for an appetizer or a salad served before the main course, then it is placed on the left (outside) of the dinner fork; if the salad is served after the main course, then the small fork is placed to the right (inside) of the dinner fork, next to the plate.
c. Napkin: The napkin is folded or put in a napkin ring and placed either to the left of the forks or on the center of the dinner plate. Sometimes, a folded napkin is placed under the forks.
d. Dinner knife: The dinner knife is set immediately to the right of the plate, cutting edge facing inward. (If the main course is meat, a steak knife can take the place of the dinner knife.) At an informal meal, the dinner knife may be used for all courses, but a dirty knife should never be placed on the table, placemat or tablecloth.
e. Spoons: Spoons go to the right of the knife. In our illustration, soup is being served first, so the soupspoon goes to the far (outside) right of the dinner knife; the teaspoon or dessert spoon, which will be used last, goes to the left (inside) of the soupspoon, next to the dinner knife.
f. Glasses: Drinking glasses of any kind – water, wine, juice, ice tea – are placed at the top right of the dinner plate, above the knives and spoons.
Other dishes and utensils are optional, depending on what is being served, but may include:
g. Salad plate: This is placed to the left of the forks. If salad is to be eaten with the meal, you can forgo the salad plate and serve it directly on the dinner plate. However, if the entrée contains gravy or anything runny, it is better to serve the salad on a separate plate to keep things neater.
h. Bread plate with butter knife: If used, the bread plate goes above the forks, with the butter knife placed diagonally across the edge of plate, handle on the right side and blade facing down.
i. Dessert spoon and fork: These can be placed either horizontally above the dinner plate (the spoon on top with its handle facing to the right; the fork below with its handle facing left); or beside the plate. If placed beside the plate, the fork goes on the left side, closest to the plate (because it will be the last fork used) and the spoon goes on the right side of the plate, to the right of the dinner knife and to the left of the soupspoon.
j. Coffee cup and saucer: Our illustration shows a table setting that would be common in a restaurant serving a large number of people at once, with coffee being served during the meal. The coffee cup and saucer are placed above and to the right of the knife and spoons. At home, most people serve coffee after the meal. In that case the cups and saucers are brought to the table and placed above and to the right of the knife and spoons.
Formal Place Setting
The one rule for a formal table is for everything to be geometrically spaced: the centerpiece at the exact center; the place settings at equal distances; and the utensils balanced. Beyond these placements, you can vary flower arrangements and decorations as you like.
The placement of utensils is guided by the menu, the idea being that you use utensils in an “outside in” order. For the illustrated place setting here, the order of the menu is:
Appetizer: Shellfish
First Course: Soup or fruit
Fish Course
Entrée
Salad
a. Service Plate: This large plate, also called a charger, serves as an underplate for the plate holding the first course, which will be brought to the table. When the first course is cleared, the service plate remains until the plate holding the entrée is served, at which point the two plates are exchanged. The charger may serve as the underplate for several courses which precede the entrée.
b. Butter plate: The small butter plate is placed above the forks at the left of the place setting.
c. Dinner fork: The largest of the forks, also called the place fork, it is placed on the left of the plate. Other smaller forks for other courses are arranged to the left or right of the dinner fork, according to when they will be used.
d. Fish fork: If there is a fish course, this small fork is placed farthest to the left of the dinner fork because it is the first fork used.
e. Salad fork: If salad is served after the entrée, the small salad fork is placed to the right of the dinner fork, next to the plate. If the salad is to be served first, and fish second, then the forks would be arranged (left to right): salad fork, fish fork, dinner fork.
f. Dinner knife: The large dinner knife is placed to the right of the dinner plate.
g. Fish knife: The specially shaped fish knife goes to the right of the dinner knife.
h. Salad knife: (Note: there is no salad knife in the illustration.) If used, according to the above menu, it would be placed to the left of the dinner fork, next to the dinner plate. If the salad is to be served first, and fish second, then the knives would be arranged (left to right):dinner knife, fish knife, salad knife.
i. Soup spoon or fruit spoon: If soup or fruit is served as a first course, then the accompanying spoon goes to the right of the knives.
j. Oyster fork: If shellfish are to be served, the oyster fork is set to the right of the spoons. Note: It is the only fork ever placed on the right of the plate.
k. Butter knife: This small spreader is paced diagonally on top of the butter plate, handle on the right and blade down.
l. Glasses: These can number up to five and are placed so that the smaller ones are in front. The water goblet (la) is placed directly above the knives. Just to the right goes a champagne flute (lb); In front of these are placed a red (lc) and/or white (ld) wine glass and a sherry glass (le)
m. Napkin: The napkin is placed on top of the charger (if one is used) or in the space for the plate.
In general:
Knife blades are always placed with the cutting edge toward the plate.
No more than three of any implement is ever placed on the table, except when an oyster fork is used in addition to three other forks. If more than three courses are served before dessert, then the utensil for the fourth course is brought in with the food; likewise the salad fork and knife may be brought in when the salad course is served.
Dessert spoons and forks are brought in on the dessert plate just before dessert is served.
So, now you're ready and able to set your Thanksgiving table. But what to use as a centerpiece is always an issue, right? And flowers get boring and even though I've still got my large flower pots at the front door full of pumpkins and squash and my bales of hay and 110 lb pumkpin and gourds are still adorning my walkway as well, I'm sort of pumpkin-ed out. Aren't you? So what I've decided to do instead this year, is bring in a little of mother nature and m ix it with some feather glittery friends and voila! It's Thanksgiving at the Monogram home!
Supplies Needed:
-various colors of fine glitter
-glue
-small dixie cups for your glitter (one cup per color)
-small artists paintbrush
-crafting/decorating birds that are painted or feathered (I found mine in the floral department at JoAnn's Craft Store)
-Tree branch
Now, This centerpiece is very easy. So easy in fact, that last December when the mini monograms were just 2 & 3, they were able to help me with this project and had lots of fun with it. So to get started, first empty each color of glitter into it's own little dixie cup. Then put some glue in the bottom of a separate cup as well. My birds already came attached with alligator clips, so hopefully yours did too. if not, then you will need to pick up some floral wire for attaching them to the branch later. Basically all you do is paint on a little glue where ever you want there to be glitter. You can paint the glue on the birds head, you can glitter their wings, you can follow a specific color pattern on the bird, or glitter the whole dog gone thing if that's what you want to do. You really can't mess this one up.Do make sure you glitter it over a dixie cup to save yourself with the cleanup. And then pour any excess glitter back into it's respective cup since you really won't use as much as you anticipate.
Once they're all glittered, clip it to a sturdy piece of card stock to dry. Cleanu=3239>253>3<;>WSNRCG=3233378537396nu0mrj.jpg">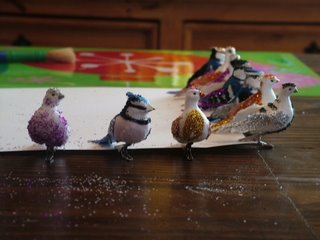 n up your glitter and glue mess, wipe down your crafting area (I am a big believer of cleaning up as you craft or cook), then head outside to find the perfect branch while your birds are drying. I found my branch on the side of the road. My usually horrible eyesight actually didn't fail on me for once, so I made a u-turn, put on those hazard lights, hopped out and snagged myself a few good branches. You really need a nice sturdy branch, relatively straight so it will lay down the center of the table, with plenty of smaller limbs shooting off of it. Now, if you really want to get into the spirit of this cold weather, put a little spots of glue on the branch and limbs and douse them with white glitter to create a snowy branch.
So now you have your branch and your birds are dry. Randomly attach  your birds to your branch and you're done! Of course, you know me and I wasn't happy stopping at that. So I laid mine down on my brown monogrammed linen table runner, sporadically placed a few red votives, then took the mini's outside to pick some fresh holly berries from my bushes in the yard. Once we clarified that these berries were not for eating, we were good to go! We colleceted lots of good berries and then I just placed them down the runner around my woodland bird centerpiece to make it even more festive. So as I said, I think I'm going to go with this centerpiece, and now I just need to work up a creative place card setting. Hmmmm....
Any ideas?


9 Comments:
if you have fall foliage by you you can press leaves in between books to flatten them out then use a gold pen to write the person's name.
I always like to make edible place cards so a simple sugar cookie with a seasonally approriate cookie cutter (leave, pumpkin, cornucopia, turkey) simply iced and then the name done with a pastry bag.
My best place cards were the easter I blew out eggs, wrote the names in white crayon and then dyed them - the wax precludes the shell from absorbing the dye so the name is outlined by the color.
The table sounds beautiful.
Yum! We will be having deep fried turkey as well! Wouldn't want it any other way!
I had to laugh at your comment about having the president over for dinner. It reminded me of when I had to take an etiquette class in high school, and they actually made us practice how to address a king or queen if we ever met them! Can you believe that? Very likely huh? I'm probably more likely to have the president over for dinner.
Setting the table, including the holidays, was the job my Grandmama gave me all the time, since I was about 8 or 9. It's good to note that the formal placing has the salad after the entree. Salads help digestion and should be served towards the end really, and not before main course.
love turkey day and all of it's fineries! love the sweet birdies- how about little pinennedle and ribbon nests for each place setting with little candies or just the little namecard...let us know what you do...
I'll be lucky if the paper plates make it on to the table this year.. LOL KIDDING *sort of!*
~EMG
A lovely table...the birds look wonderful. Are your boys good about staying away from candles? I got The Boy a haircut yesterday, and wouldn't you know, I don't like it. Just in time for photos. I need to loosen up, I think :D
This is a very informative post...liked it a lot...will share it with all my blogger friends...and hey for some more related and useful resources do check out my Thanksgiving Blog and enjoy all that's there....have a great Thanksgiving!!!!
I love your blog!! Great super fantastic useful info!
Wishing you and yours a Happy Thanksgiving.
p.s. just a little side comment
am I just gettin' old or is Pink type a little harder to read than black? I love your site but sometimes have to skip it cuz it's too much on my eyes.
eeek. I am getting old.
Post a Comment